The X desktop can be set to start as soon as you log in from a tty prompt. Edit your bash profile with
nano -w .profile
and add these lines to the end:
if [ -z "$DISPLAY" ] && [ $(tty) == /dev/tty1 ]; then
startx
fi
Save and exit. At next log in, X should start straightaway. This will also work for other programs that you want to start at the console, at login.
Friday, October 3, 2008

What looks do I like?
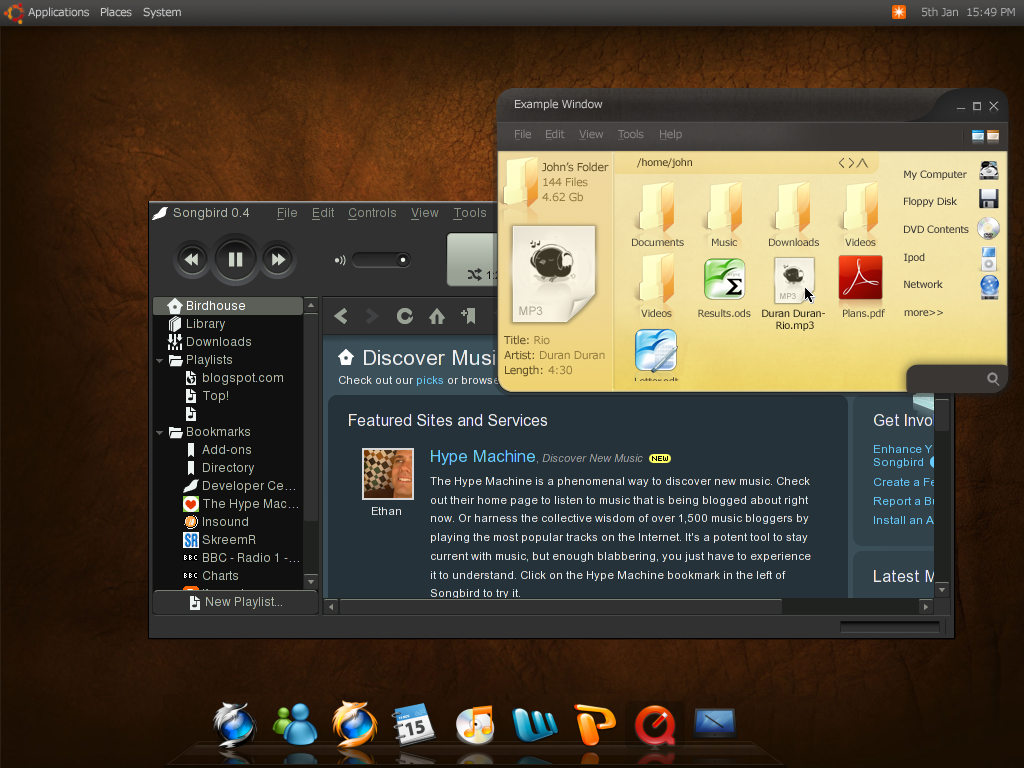
On the internet you see the most incredible looks presented.
Most of them are black and shiny and very sophisticated.
There is one I like very much, but it/ s a mockup and not (yet) available.
But in fact I like a very quiet and friendly atmosphere on te desktop.
Everybody is bashing the standard Hardy Ubuntu look but I thinks itś not so bad at all.
It's clear and gives no distractions for the newcomer like me.
I had to disable Compiz as Ubuntu kept crashing because of it.
So I use Metacity as windowsmanager now and it's doing its job rather well.
Yesterday I activated the composite manager in Metacity and installed transet to create opaque or transparent windows. This is all foolishness and eye candy, but the looks are important.
Well to start with the LogIn Screen and the Lock up. The most beautiful theme for this I found was the New Wave theme. It so beautiful that I can't imagine it ever leaving it behind.

http://www.gnome-look.org/content/show.php/show.php?content=87370
To use the whole theme that looks very distinguished and sharp is th shiny and dark for my liking; too serious.
So I found an OSX look alike, Water Vapor; the fine thing with this theme that it's quiet, clear and very nice to use.
http://www.gnome-look.org/content/show.php/Water+Vapor?content=26980
But I'm running Ubuntu and not a Mac and I wanted the looks to express that.
So I found the Aquarius theme: http://art.gnome.org/themes/metacity/1324
and http://art.gnome.org/themes/gtk2/1325
The icons I choose are Gartoon: http://art.gnome.org/themes/icon/1001
The lettertype is Undotum 11 (window title 12) and the document font Dejavu Sans Book 11.
Here is a screenshot:

 Quickpost this image to Myspace, Digg, Facebook, and others!
Thursday, October 2, 2008
Transparency In Gnome/Metacity
Go to Gconfig editor and open apps, metacity, general and check compositing_manager.
Install transet: sudo apt-get install transset.
Using Transset for transparent windows in Gnome:
This is just an extra little command. If you want to set certain windows as transparent, then run the command "transset" in the console. Your mouse will turn into a crosshair; simply click on the window you want to set as transparent. The transparency value can be anywhere from 0 (completely transparent) to 1 (opaque.) It defaults to .75, and back to 1 if the window is already transparent.
For example, if you want to make a window half-transparent: transset 0.5.
Now make two launchers in the panel: one with command transset 0.5, the other one with transset 1.0 and you will be able the transparency mode easily.
and call them transSet and TransUndo. And you
Install transet: sudo apt-get install transset.
Using Transset for transparent windows in Gnome:
This is just an extra little command. If you want to set certain windows as transparent, then run the command "transset" in the console. Your mouse will turn into a crosshair; simply click on the window you want to set as transparent. The transparency value can be anywhere from 0 (completely transparent) to 1 (opaque.) It defaults to .75, and back to 1 if the window is already transparent.
For example, if you want to make a window half-transparent: transset 0.5.
Now make two launchers in the panel: one with command transset 0.5, the other one with transset 1.0 and you will be able the transparency mode easily.
and call them transSet and TransUndo. And you
Terminal Wildcards
Manipulating Files
This lesson will introduce you to the following commands:
- cp - copy files and directories
- mv - move or rename files and directories
- rm - remove files and directories
- mkdir - create directories
These four commands are among the most frequently used Linux commands. They are the basic commands for manipulating both files and directories.
Now, to be frank, some of the tasks performed by these commands are more easily done with a graphical file manager. With a file manager, you can drag and drop a file from one directory to another, cut and paste files, delete files, etc. So why use these old command line programs?
The answer is power and flexibility. While it is easy to perform simple file manipulations with a graphical file manager, complicated tasks can be easier with the command line programs. For example, how would you copy all the HTML files from one directory to another, but only copy files that did not exist in the destination directory or were newer than the versions in the destination directory? Pretty hard with with a file manager. Pretty easy with the command line:
[me@linuxbox me]$ cp -u *.html destination
Wildcards
Before I begin with our commands, I want to talk about a shell feature that makes these commands so powerful. Since the shell uses filenames so much, it provides special characters to help you rapidly specify groups of filenames. These special characters are called wildcards. Wildcards allow you to select filenames based on patterns of characters. The table below lists the wildcards and what they select:
| Wildcard | Meaning |
|---|---|
| * | Matches any characters |
| ? | Matches any single character |
| [characters] | Matches any character that is a member of the set characters. The set of characters can be expressed as a range of characters. (For example, [A-Z] represents all uppercase letters) |
| [!characters] | Matches any character that is not a member of the set characters |
Using wildcards, it is possible to construct very sophisticated selection criteria for filenames. Here are some examples of patterns and what they match:
| Pattern | Matches |
|---|---|
| * | All filenames |
| g* | All filenames that begin with the character “g” |
| b*.txt | All filenames that begin with the character “b” and end with the characters “.txt” |
| Data??? | Any filename that begins with the characters “Data” followed by exactly 3 more characters |
| [abc]* | Any filename that begins with “a” or “b” or “c” followed by any other characters |
| [A-Z]* | Any filename that begins with an uppercase letter. This is an example of a range. |
| BACKUP.[0-9][0-9][0-9] | Another example of ranges. This pattern matches any filename that begins with the characters “BACKUP.” followed by exactly 3 numerals. |
| [!a-z]* | Any filename that does not begin with a lowercase letter. |
You can use wildcards with any command that accepts filename arguments.
cp
The cp program copies files and directories. In its simplest form, it copies a single file:
[me@linuxbox me]$ cp file1 file2
It can also be used to copy multiple files to a different directory:
[me@linuxbox me]$ cp file1 file2 file3 directory
Other useful examples of cp and its options include:
| Command | Results |
|---|---|
| cp file1 file2 | Copies the contents of file1 into file2. If file2 does not exist, it is created; otherwise, file2 is overwritten with the contents of file1. |
| cp -i file1 file2 | Like above however, since the “-i” (interactive) option is specified, if file2 exists, the user is prompted before it is overwritten with the contents of file1. |
| cp file1 dir1 | Copy the contents of file1 (into a file named file1) inside of directory dir1. |
| cp -R dir1 dir2 | Copy the contents of the directory dir1. If directory dir2 does not exist, it is created. Otherwise, it creates a directory named dir1 within directory dir2. |
mv
The mv command performs two different functions depending on how it is used. It will either move one or more files to a different directory, or it will rename a file or directory. To rename a file, it is used like this:
[me@linuxbox me]$ mv filename1 filename2
To move files to a different directory:
[me@linuxbox me]$ mv file1 file2 file3 directory
Examples of mv and its options include:
| Command | Results |
|---|---|
| mv file1 file2 | If file2 does not exist, then file1 is renamed file2. If file2 exists, its contents are replaced with the contents of file1. |
| mv -i file1 file2 | Like above however, since the “-i” (interactive) option is specified, if file2 exists, the user is prompted before it is overwritten with the contents of file1. |
| mv file1 file2 file3 dir1 | The files file1, file2, file3 are moved to directory dir1. dir1 must exist or mv will exit with an error. |
| mv dir1 dir2 | If dir2 does not exist, then dir1 is renamed dir2. If dir2 exists, the directory dir1 is created within directory dir2. |
rm
The rm command deletes (removes) files and directories.
[me@linuxbox me]$ rm file
It can also be used to delete a directory:
[me@linuxbox me]$ rm -r directory
Examples of rm and its options include:
| Command | Results |
|---|---|
| rm file1 file2 | Delete file1 and file2. |
| rm -i file1 file2 | Like above however, since the “-i” (interactive) option is specified, the user is prompted before each file is deleted. |
| rm -r dir1 dir2 | Directories dir1 and dir2 are deleted along with all of their contents. |
Be careful with rm!
Linux does not have an undelete command. Once you delete a file with rm, it’s gone. You can inflict terrific damage on your system with rm if you are not careful, particularly with wildcards.
Before you use rm with wildcards, try this helpful trick: construct your command using ls instead. By doing this, you can see the effect of your wildcards before you delete files. After you have tested your command with ls, recall the command with the up-arrow key and then substitute rm for ls in the command.
mkdir
The mkdir command is used to create directories. To use it, you simply type:
[me@linuxbox me]$ mkdir directory
Manipulating Files
This lesson will introduce you to the following commands:
- cp - copy files and directories
- mv - move or rename files and directories
- rm - remove files and directories
- mkdir - create directories
These four commands are among the most frequently used Linux commands. They are the basic commands for manipulating both files and directories.
Now, to be frank, some of the tasks performed by these commands are more easily done with a graphical file manager. With a file manager, you can drag and drop a file from one directory to another, cut and paste files, delete files, etc. So why use these old command line programs?
The answer is power and flexibility. While it is easy to perform simple file manipulations with a graphical file manager, complicated tasks can be easier with the command line programs. For example, how would you copy all the HTML files from one directory to another, but only copy files that did not exist in the destination directory or were newer than the versions in the destination directory? Pretty hard with with a file manager. Pretty easy with the command line:
[me@linuxbox me]$ cp -u *.html destination
Wildcards
Before I begin with our commands, I want to talk about a shell feature that makes these commands so powerful. Since the shell uses filenames so much, it provides special characters to help you rapidly specify groups of filenames. These special characters are called wildcards. Wildcards allow you to select filenames based on patterns of characters. The table below lists the wildcards and what they select:
| Wildcard | Meaning |
|---|---|
| * | Matches any characters |
| ? | Matches any single character |
| [characters] | Matches any character that is a member of the set characters. The set of characters can be expressed as a range of characters. (For example, [A-Z] represents all uppercase letters) |
| [!characters] | Matches any character that is not a member of the set characters |
Using wildcards, it is possible to construct very sophisticated selection criteria for filenames. Here are some examples of patterns and what they match:
| Pattern | Matches |
|---|---|
| * | All filenames |
| g* | All filenames that begin with the character “g” |
| b*.txt | All filenames that begin with the character “b” and end with the characters “.txt” |
| Data??? | Any filename that begins with the characters “Data” followed by exactly 3 more characters |
| [abc]* | Any filename that begins with “a” or “b” or “c” followed by any other characters |
| [A-Z]* | Any filename that begins with an uppercase letter. This is an example of a range. |
| BACKUP.[0-9][0-9][0-9] | Another example of ranges. This pattern matches any filename that begins with the characters “BACKUP.” followed by exactly 3 numerals. |
| [!a-z]* | Any filename that does not begin with a lowercase letter. |
You can use wildcards with any command that accepts filename arguments.
cp
The cp program copies files and directories. In its simplest form, it copies a single file:
[me@linuxbox me]$ cp file1 file2
It can also be used to copy multiple files to a different directory:
[me@linuxbox me]$ cp file1 file2 file3 directory
Other useful examples of cp and its options include:
| Command | Results |
|---|---|
| cp file1 file2 | Copies the contents of file1 into file2. If file2 does not exist, it is created; otherwise, file2 is overwritten with the contents of file1. |
| cp -i file1 file2 | Like above however, since the “-i” (interactive) option is specified, if file2 exists, the user is prompted before it is overwritten with the contents of file1. |
| cp file1 dir1 | Copy the contents of file1 (into a file named file1) inside of directory dir1. |
| cp -R dir1 dir2 | Copy the contents of the directory dir1. If directory dir2 does not exist, it is created. Otherwise, it creates a directory named dir1 within directory dir2. |
mv
The mv command performs two different functions depending on how it is used. It will either move one or more files to a different directory, or it will rename a file or directory. To rename a file, it is used like this:
[me@linuxbox me]$ mv filename1 filename2
To move files to a different directory:
[me@linuxbox me]$ mv file1 file2 file3 directory
Examples of mv and its options include:
| Command | Results |
|---|---|
| mv file1 file2 | If file2 does not exist, then file1 is renamed file2. If file2 exists, its contents are replaced with the contents of file1. |
| mv -i file1 file2 | Like above however, since the “-i” (interactive) option is specified, if file2 exists, the user is prompted before it is overwritten with the contents of file1. |
| mv file1 file2 file3 dir1 | The files file1, file2, file3 are moved to directory dir1. dir1 must exist or mv will exit with an error. |
| mv dir1 dir2 | If dir2 does not exist, then dir1 is renamed dir2. If dir2 exists, the directory dir1 is created within directory dir2. |
rm
The rm command deletes (removes) files and directories.
[me@linuxbox me]$ rm file
It can also be used to delete a directory:
[me@linuxbox me]$ rm -r directory
Examples of rm and its options include:
| Command | Results |
|---|---|
| rm file1 file2 | Delete file1 and file2. |
| rm -i file1 file2 | Like above however, since the “-i” (interactive) option is specified, the user is prompted before each file is deleted. |
| rm -r dir1 dir2 | Directories dir1 and dir2 are deleted along with all of their contents. |
Be careful with rm!
Linux does not have an undelete command. Once you delete a file with rm, it’s gone. You can inflict terrific damage on your system with rm if you are not careful, particularly with wildcards.
Before you use rm with wildcards, try this helpful trick: construct your command using ls instead. By doing this, you can see the effect of your wildcards before you delete files. After you have tested your command with ls, recall the command with the up-arrow key and then substitute rm for ls in the command.
mkdir
The mkdir command is used to create directories. To use it, you simply type:
[me@linuxbox me]$ mkdir directory
http://www.linuxhaxor.net/2007/08/21/manipulating-files/
pdumpfs: A Daily Backup System
pdumpfs is a simple daily backup system similar to Plan9’s dumpfs which preserves every daily snapshot. pdumpfs is written in Ruby. You can access the past snapshots at any time for retrieving a certain day’s file. Let’s backup your home directory with pdumpfs!
pdumpfs constructs the snapshot YYYY/MM/DD in the destination directory. All source files are copied to the snapshot directory for the first time. On and after the second time, pdumpfs copies only updated or newly created files and stores unchanged files as hard links to the files of the previous day’s snapshot for saving a disk space.
Limitations
- pdumpfs can handle only normal files, directories, and symbolic links
- pdumpfs is not suited for a directory containing large files which update frequently
- With pdumpfs, you can easily remove unnecessary files because the past files can be retrieved at any time.
pdumpfs in it’s simple form uses the following syntex to backup directories/files:
pdumpfs <> <>
Create a Bootable Ubuntu USB Flash Drive the Easy Way
We've already covered how to use an Ubuntu Live CD to backup files from your dead Windows computer, but using the boot cd can sometimes be a little slow. We can speed up the booting process by installing Ubuntu to a bootable USB flash drive instead.
soruce:
http://www.howtogeek.com/howto/linux/create-a-bootable-ubuntu-usb-flash-drive-the-easy-way/
To accomplish this, we'll use a tiny software package called UNetbootin, which is designed to make the installation process simple and easy.
Create the Bootable Flash Drive
You'll first need to download the UNetbootin software and save it somewhere useful, since there's no installation required, just double-click to run.
I chose to use an already downloaded ISO image of the Ubuntu installation cd, and then chose my flash drive, and clicked the OK button. Yes, this step is as simple as that.

The process will extract the files from the ISO image (or download them), copy them to the flash drive and then install the bootloader. Depending on what you are installing, this really doesn't take very long.

Once the process is completed, you'll be prompted to reboot… which you don't necessarily have to do unless you want to test booting the flash drive on the same machine you are using.

Otherwise you can hit the Exit button.
Make Sure the Partition is Active
If you get a boot device error when you try and boot from the flash device, it could be that your partition is not marked as active. What we'll do is use the command line diskpart utility to fix this… if you are in Vista open an administrator mode command prompt by right-clicking and choosing Run as Administrator.
Now you'll need to run this command to figure out the number of your flash drive:
list disk
This will show you the list of drives, and you will use the disk number in the "select disk" command:
select disk 1
select partition 1
active
The "active" command will actually mark the current partition as active, which is why you need to select the disk and then the partition. At this point you should be done.

Booting From the Flash Drive
Now that you are all finished, you can try and boot from the flash drive. Every BIOS is different, but most of them will have a message like "Press F12 for the Boot Menu", which is highly suggested. The boot menu will allow you to select the USB drive as the boot device. (apologies for the simply horrible camera phone screenshots)

Instead of the regular Ubuntu boot menu that you might be used to seeing, you will see the UNetbootin menu, which has essentially the same options.

Useful Note
If you are having issues booting Ubuntu Hardy (8.04) on a Dell machine, you might want to switch back to using Ubuntu 7.10 instead.
I was able to boot all the way into the desktop in about 35 seconds using the flash drive… way faster than using the regular live cd.

Stay tuned, we're going to explore even more options for bootable CDs and USB drives that help you repair your computer.
Clonezilla backs up partitions and disks
What's Clonezilla?
http://www.clonezilla.org/
According to its homepage, Clonezilla is a GPL-licensed cloning system much like the proprietary Norton Ghost and the open source Partimage. But unlike these applications, Clonezilla emphasizes cloning many disks simultaneously. To do this it needs you to make a couple of changes in your existing setup, like providing a Diskless Remote Boot in Linux (DRBL) server and enabling all computers to boot over the network.
But for occasional emergencies at home or a small office, you can forgo setting up a dedicated server and instead use the live CD to hop from one machine to another, backing up and restoring partitions. Even from the live CD you can use Clonezilla to back up and restore individual or multiple partitions or complete disks to local disks or to external USB storage, or over the network via Samba and SSH.
Another benefit of using Clonezilla is that for filesystems it supports (ext2/3, ReiserFS, XFS, JFS, FAT, NTFS), it saves only blocks that are in use instead of backing up the complete partition or disk. This not only makes the cloning and restoring process faster but also results in smaller backups.
Booting the live CD
The GParted-Clonezilla live CD is packaged and distributed by the GParted project. The Clonezilla project has a Clonezilla-only live CD as well. For this article, I used the latest version of the GParted-Clonezilla live CD, v1.9.
source: http://www.linux.com/feature/115208
I use the clonezillacd without gparted: http://www.clonezilla.org/download/sourceforge/
When you download the GParted-Clonezilla live CD, burn it onto a CD, and boot, you'll notice its GRUB screen lists some 23 boot options. The first 11 options help you run GParted with all types of hardware, from Apple MacBooks to Hewlett-Packard laptops. For most users, the default first option should work.
The next five options concern Clonezilla. Using these options you can copy Clonezilla to RAM and free the CD or DVD drive, or run it with minimum options to make it run in any environment. Again, the default option to simply run Clonezilla should work for most users. The last seven options let you skip booting either GParted or Clonezilla, instead passing control over to an operating system installed on the disks.
Using Clonezilla to clone partitions and disks
When you boot Clonezilla, it asks you basic questions about setting up the language and keyboard layout. Select the default options to keep English and the US keyboard layout. Next, the boot process asks whether you'd like to run Clonezilla from the command line. Unless you are an experienced Clonezilla user, select the option to "Start_Clonezilla" instead of being dropped to the shell.
Now comes the first question that's going to have an effect on your backup. You have to select where the directory with your backup image will be stored. The options presented include a local drive, an SSH server, or a Samba server. If you choose to mount a local drive, the next screen lists the partitions available on the local disks, including partitions on any USB drives attached to the computer. Needless to say, make sure you don't select the partition you want to back up! If instead of mounting a local drive you choose to mount a remote partition over Samba or SSH, Clonezilla will ask for relevant connection information, such as server name or IP address, username, and password.
Once you've selected a partition, either local or remote, Clonezilla will mount it and display its disk space usage, then display a screen with four options -- save disk, restore disk, save parts, and restore parts. Irrespective of what save option you select, you're next presented with four advanced Clonezilla parameters. Most of the time you can use the default options, which will use ntfsclone to clone NTFS partitions and will make Clonezilla wait for your approval before cloning.
Next you select from among four compression methods that offer a different balance between speed and size. The first option makes clones the fastest because it doesn't compress them at all. The second option uses gzip, the third uses bzip2 to create the smallest images but takes longer to complete, and the last option uses the LZO compression algorithm with gzip to create faster clones. This is the default selection.
The penultimate step is to choose the name of the folder that'll house the clones. By default Clonezilla names that folder according to the current date and time. Finally, select the disk or the partitions to clone from the ones listed. Clonezilla lists only unmounted partitions; if you don't see the partition you want to back up in this list, chances are that you have accidentally selected it as the partition, or the drive it resides in, to store your backup. If this is the case, you'll have to quit Clonezilla and start again.
That's it as far as cloning is concerned. If you asked Clonezilla to confirm before cloning, it'll prompt you whether it should proceed. Depending on the size of the partition and the compression method, the cloning process can take some time. I backed up an entire disk with three partitions, one FAT32, one ext3, and one swap, totaling just 2.3GB. Clonezilla cloned the whole disk onto a USB 2.0 drive in about 9 minutes, and using the default compression method squeezed it to less than 950MB.
Restoring partitions and disks
Once you've backed up partitions, you can use GParted and alter the disk or prepare a new one. Since using GParted is already well documented, I'll not repeat the steps here. Once you have prepared the disks, you can restore the partitions.
The process of restoring cloned partitions or disks, isn't much different from cloning them. You again begin by answering the language and keyboard questions. But instead of selecting resources to save the clone to, you select the local or network resource to restore the cloned image from.
When you select the partition or disk to restore from, Clonezilla presents you with a list of 13 parameters, including the option to reinstall the contents of the master boot record, if you choose to restore disks. While Clonezilla did recreate my disk as it was, it couldn't reinstall the LILO boot loader my old Knoppix 3.7 distro was using. Same story with GRUB. Unless I cloned and restored a complete disk, my boot loader wasn't restored properly. But you can easily add a boot loader to a disk using any live rescue CD.
The real benefit of Clonezilla becomes apparent when you restore individual partitions. If you have a partition that is almost full and surrounded by other partitions -- say a 1GB sda1 -- first clone it, then move to another disk and create a larger 20GB sda1 partition using GParted. Or, after cloning, use GParted to grow the partition following sda1, to use the freed up space, and create an sda1 partition at the end of the disk. Now use Clonezilla to restore the old 1GB sda1 partition on this new 20GB sda1 target partition. Once the process is complete you'll have moved whatever was on your 1GB partition into bigger real estate on the same or another disk. Just remember to select the "Do not create partition in target hard disk in client" option from the advanced parameters listed while restoring the partition. If you forget, Clonezilla will resize the 20GB partition to the original 1GB size.
Conclusion
For a home user or an administrator with just a few systems, the GParted-Clonezilla live CD is an excellent tool for managing disks. It can save you several hours when preparing new disks or migrating partitions from one disk to another. It's also a fantastic way to move a partition that's not around free space into a bigger partition without much fuss.
But bear in mind that both GParted and Clonezilla are dangerous utilities. To get comfortable with them, consider trying them out on a virtual machine with virtual disks and virtual partitions and no critical data. Unless you want to simply duplicate partitions or disks, you'll need to play with the advanced parameters. Because the Clonezilla project makes virtually no documentation available, I also suggest you make a cheat sheet for yourself as you go along using the app, listing the advanced parameters to choose for particular operations. This is useful if you regularly need to repeat a particular type of partitioning task, such as cloning partitions and moving them to bigger ones on another disk.
http://www.clonezilla.org/
According to its homepage, Clonezilla is a GPL-licensed cloning system much like the proprietary Norton Ghost and the open source Partimage. But unlike these applications, Clonezilla emphasizes cloning many disks simultaneously. To do this it needs you to make a couple of changes in your existing setup, like providing a Diskless Remote Boot in Linux (DRBL) server and enabling all computers to boot over the network.
But for occasional emergencies at home or a small office, you can forgo setting up a dedicated server and instead use the live CD to hop from one machine to another, backing up and restoring partitions. Even from the live CD you can use Clonezilla to back up and restore individual or multiple partitions or complete disks to local disks or to external USB storage, or over the network via Samba and SSH.
Another benefit of using Clonezilla is that for filesystems it supports (ext2/3, ReiserFS, XFS, JFS, FAT, NTFS), it saves only blocks that are in use instead of backing up the complete partition or disk. This not only makes the cloning and restoring process faster but also results in smaller backups.
Booting the live CD
The GParted-Clonezilla live CD is packaged and distributed by the GParted project. The Clonezilla project has a Clonezilla-only live CD as well. For this article, I used the latest version of the GParted-Clonezilla live CD, v1.9.
source: http://www.linux.com/feature/115208
I use the clonezillacd without gparted: http://www.clonezilla.org/download/sourceforge/
When you download the GParted-Clonezilla live CD, burn it onto a CD, and boot, you'll notice its GRUB screen lists some 23 boot options. The first 11 options help you run GParted with all types of hardware, from Apple MacBooks to Hewlett-Packard laptops. For most users, the default first option should work.
The next five options concern Clonezilla. Using these options you can copy Clonezilla to RAM and free the CD or DVD drive, or run it with minimum options to make it run in any environment. Again, the default option to simply run Clonezilla should work for most users. The last seven options let you skip booting either GParted or Clonezilla, instead passing control over to an operating system installed on the disks.
Using Clonezilla to clone partitions and disks
When you boot Clonezilla, it asks you basic questions about setting up the language and keyboard layout. Select the default options to keep English and the US keyboard layout. Next, the boot process asks whether you'd like to run Clonezilla from the command line. Unless you are an experienced Clonezilla user, select the option to "Start_Clonezilla" instead of being dropped to the shell.
Now comes the first question that's going to have an effect on your backup. You have to select where the directory with your backup image will be stored. The options presented include a local drive, an SSH server, or a Samba server. If you choose to mount a local drive, the next screen lists the partitions available on the local disks, including partitions on any USB drives attached to the computer. Needless to say, make sure you don't select the partition you want to back up! If instead of mounting a local drive you choose to mount a remote partition over Samba or SSH, Clonezilla will ask for relevant connection information, such as server name or IP address, username, and password.
Once you've selected a partition, either local or remote, Clonezilla will mount it and display its disk space usage, then display a screen with four options -- save disk, restore disk, save parts, and restore parts. Irrespective of what save option you select, you're next presented with four advanced Clonezilla parameters. Most of the time you can use the default options, which will use ntfsclone to clone NTFS partitions and will make Clonezilla wait for your approval before cloning.
Next you select from among four compression methods that offer a different balance between speed and size. The first option makes clones the fastest because it doesn't compress them at all. The second option uses gzip, the third uses bzip2 to create the smallest images but takes longer to complete, and the last option uses the LZO compression algorithm with gzip to create faster clones. This is the default selection.
The penultimate step is to choose the name of the folder that'll house the clones. By default Clonezilla names that folder according to the current date and time. Finally, select the disk or the partitions to clone from the ones listed. Clonezilla lists only unmounted partitions; if you don't see the partition you want to back up in this list, chances are that you have accidentally selected it as the partition, or the drive it resides in, to store your backup. If this is the case, you'll have to quit Clonezilla and start again.
That's it as far as cloning is concerned. If you asked Clonezilla to confirm before cloning, it'll prompt you whether it should proceed. Depending on the size of the partition and the compression method, the cloning process can take some time. I backed up an entire disk with three partitions, one FAT32, one ext3, and one swap, totaling just 2.3GB. Clonezilla cloned the whole disk onto a USB 2.0 drive in about 9 minutes, and using the default compression method squeezed it to less than 950MB.
Restoring partitions and disks
Once you've backed up partitions, you can use GParted and alter the disk or prepare a new one. Since using GParted is already well documented, I'll not repeat the steps here. Once you have prepared the disks, you can restore the partitions.
The process of restoring cloned partitions or disks, isn't much different from cloning them. You again begin by answering the language and keyboard questions. But instead of selecting resources to save the clone to, you select the local or network resource to restore the cloned image from.
When you select the partition or disk to restore from, Clonezilla presents you with a list of 13 parameters, including the option to reinstall the contents of the master boot record, if you choose to restore disks. While Clonezilla did recreate my disk as it was, it couldn't reinstall the LILO boot loader my old Knoppix 3.7 distro was using. Same story with GRUB. Unless I cloned and restored a complete disk, my boot loader wasn't restored properly. But you can easily add a boot loader to a disk using any live rescue CD.
The real benefit of Clonezilla becomes apparent when you restore individual partitions. If you have a partition that is almost full and surrounded by other partitions -- say a 1GB sda1 -- first clone it, then move to another disk and create a larger 20GB sda1 partition using GParted. Or, after cloning, use GParted to grow the partition following sda1, to use the freed up space, and create an sda1 partition at the end of the disk. Now use Clonezilla to restore the old 1GB sda1 partition on this new 20GB sda1 target partition. Once the process is complete you'll have moved whatever was on your 1GB partition into bigger real estate on the same or another disk. Just remember to select the "Do not create partition in target hard disk in client" option from the advanced parameters listed while restoring the partition. If you forget, Clonezilla will resize the 20GB partition to the original 1GB size.
Conclusion
For a home user or an administrator with just a few systems, the GParted-Clonezilla live CD is an excellent tool for managing disks. It can save you several hours when preparing new disks or migrating partitions from one disk to another. It's also a fantastic way to move a partition that's not around free space into a bigger partition without much fuss.
But bear in mind that both GParted and Clonezilla are dangerous utilities. To get comfortable with them, consider trying them out on a virtual machine with virtual disks and virtual partitions and no critical data. Unless you want to simply duplicate partitions or disks, you'll need to play with the advanced parameters. Because the Clonezilla project makes virtually no documentation available, I also suggest you make a cheat sheet for yourself as you go along using the app, listing the advanced parameters to choose for particular operations. This is useful if you regularly need to repeat a particular type of partitioning task, such as cloning partitions and moving them to bigger ones on another disk.
Subscribe to:
Posts (Atom)