Sun PDF Import Adds PDF Editing to OpenOffice
By Adam Pash, 1:00 PM on Wed Oct 22 2008, 7,264 views
OpenOffice.org only (Windows/Mac/Linux): The Sun PDF Import extension imports and edits PDFs with the free Microsoft Office alternative OO.org. Rather than import the PDFs into the Writer program, the extension works with OO.org's Draw application. Once imported, you can still edit text or other portions of the document. The extension isn't perfect, but it appears to be under active development and could come in really handy under the right circumstances. The Sun PDF Import extension is free, works wherever OpenOffice.org 3.0 does. If you're looking to add more great functionality to OpenOffice.org, check out previously mentioned extensions like OpenOffice.org2GoogleDocs, Writer's Tools, and LanguageTool. Want to learn more about whether OO.org can replace Office, check out our first look at the latest release.
http://lifehacker.com/5067125/sun-pdf-import-adds-pdf-editing-to-openofficeorg
Thursday, December 18, 2008

install open office 3 in Hardy
Howto: Openoffice 3 in Hardy Heron (8.04)
A note for this tutorial: if you are using a language other than English the exact commands that I post here won't work, but you can substitute for non-English file names.
This tutorial is written assuming you want to keep the 2.4 version on your box.
I choose to uninstall version 2.4 via Synaptic
Step 1 - Download
Go to http://download.openoffice.org/other.html and download the file in your language (english) under the "Linux DEB" column. Save in your home directory.
Step 2 - Install
Open a terminal in Applications - Accessories - Terminal and run:
Code:
tar xvfz OOo_3.0.0_LinuxIntel_install_en-US_deb.tar.gz
cd OOO300_m9_native_packed-1_en-US.9358/DEBS/
sudo dpkg -i *.deb
step 3:
Code:
cd OOO300_m9_native_packed-1_en-US.9358/DEBS/desktop-integration
sudo dpkg -i *.deb
source http://ubuntuforums.org/showthread.php?t=982652
A note for this tutorial: if you are using a language other than English the exact commands that I post here won't work, but you can substitute for non-English file names.
This tutorial is written assuming you want to keep the 2.4 version on your box.
I choose to uninstall version 2.4 via Synaptic
Step 1 - Download
Go to http://download.openoffice.org/other.html and download the file in your language (english) under the "Linux DEB" column. Save in your home directory.
Step 2 - Install
Open a terminal in Applications - Accessories - Terminal and run:
Code:
tar xvfz OOo_3.0.0_LinuxIntel_install_en-US_deb.tar.gz
cd OOO300_m9_native_packed-1_en-US.9358/DEBS/
sudo dpkg -i *.deb
step 3:
Code:
cd OOO300_m9_native_packed-1_en-US.9358/DEBS/desktop-integration
sudo dpkg -i *.deb
source http://ubuntuforums.org/showthread.php?t=982652
Wednesday, December 3, 2008
HjSplit for Linux
lxSplit splits and merges files with the -s and -j flags respectively. Starting with version 0.2.1, lxSplit can handle large files (>= 4 GB) both when splitting and joining.
Examples:
To split a big file into smaller pieces of 15 MB each, run the following command:
lxsplit -s hugefile.bin 15M
Output size can be given in (M)egabytes, (k)ilobytes and (b)ytes.
To merge (join) the already split pieces into the original big file, run this command:
lxsplit -j smallfiles.bin.001
Download
lxSplit is free software and is distributed under the GNU General Public License v2.
The latest version is 0.2.4.
* Source tarball: lxsplit-0.2.4.tar.gz
* Source RPM : lxsplit-0.2.4-1.src.rpm
* i386 Linux RPM (built on RedHat 9): lxsplit-0.2.4-1.i386.rpm
* x86_64 Linux RPM (built on Fedora6): lxsplit-0.2.4-1.x86_64.rpm
* i386 Debian package: lxsplit_0.2.4-1_i386.deb
The deb package was provided by Christopher Lunsford. See his site for possible updates.
See debian-multimedia.org for more deb packages of lxsplit.
source: http://lxsplit.sourceforge.net/
Examples:
To split a big file into smaller pieces of 15 MB each, run the following command:
lxsplit -s hugefile.bin 15M
Output size can be given in (M)egabytes, (k)ilobytes and (b)ytes.
To merge (join) the already split pieces into the original big file, run this command:
lxsplit -j smallfiles.bin.001
Download
lxSplit is free software and is distributed under the GNU General Public License v2.
The latest version is 0.2.4.
* Source tarball: lxsplit-0.2.4.tar.gz
* Source RPM : lxsplit-0.2.4-1.src.rpm
* i386 Linux RPM (built on RedHat 9): lxsplit-0.2.4-1.i386.rpm
* x86_64 Linux RPM (built on Fedora6): lxsplit-0.2.4-1.x86_64.rpm
* i386 Debian package: lxsplit_0.2.4-1_i386.deb
The deb package was provided by Christopher Lunsford. See his site for possible updates.
See debian-multimedia.org for more deb packages of lxsplit.
source: http://lxsplit.sourceforge.net/
Sunday, November 2, 2008
Fav apps and themes
Apps:
Thunar, Krusader, Sakura(term), dmenu, gmrun, smplayer and vlc, amarok + amarok full screen, k3b, Mirage (image viewer), gedit, kompozer , sylheed, xdiskusage, Clonezilla (backup), jdiskreport.jdownloader,xgamma, EnvyNG, Cairo-dock, ePDFViewer, firefox with adblock plus, mediaplayerconnectivity, foxmarks, stumble, fastdial, fireftp, image fetcher, google notebook,linkification and download statusbar.
Force Quit button, Synaptic, HPLIP Toolbox, Conky.
Couldn't leave utorrent and EAC
Two setups for two users: a gnome and openbox user
Fav gnome theme : Aquarius with Dropline Neu icons
Fav openbox theme: Tranquility:
http://box-look.org/content/show.php?content=67550
with this wallpaper:
http://netghost.deviantart.com/art/pine-glitch-1146003
another nice one:
http://dlanham.com/art/fall/fall1_full.jpg
Fav fonts Deja Vu Sans Book and Undotum
Thunar, Krusader, Sakura(term), dmenu, gmrun, smplayer and vlc, amarok + amarok full screen, k3b, Mirage (image viewer), gedit, kompozer , sylheed, xdiskusage, Clonezilla (backup), jdiskreport.jdownloader,xgamma, EnvyNG, Cairo-dock, ePDFViewer, firefox with adblock plus, mediaplayerconnectivity, foxmarks, stumble, fastdial, fireftp, image fetcher, google notebook,linkification and download statusbar.
Force Quit button, Synaptic, HPLIP Toolbox, Conky.
Couldn't leave utorrent and EAC
Two setups for two users: a gnome and openbox user
Fav gnome theme : Aquarius with Dropline Neu icons
Fav openbox theme: Tranquility:
http://box-look.org/content/show.php?content=67550
with this wallpaper:
http://netghost.deviantart.com/art/pine-glitch-1146003
another nice one:
http://dlanham.com/art/fall/fall1_full.jpg
Fav fonts Deja Vu Sans Book and Undotum
Friday, October 31, 2008
Dmenu great app launcher for Openbox
Dmenu is the application menu developed for dwm and used by several other tiling window managers. It can easily be used in Openbox as well; read this post for more info on using Dmenu in Openbox. See here for how to use it with mpd.
First, you’ll need to install dmenu. You can download the source code from the dwm/wmii website and install that (’sudo make clean install’ in Ubuntu). It's also in the repo's.
You need to add dmenu.sh script to /usr/bin with this
Code:
#!/bin/sh
exe=`dmenu_path | dmenu ${1+"$@"}` && exec $exe
Create a text file with this and call it dmenu.sh and don't forget to make it executable (right click, properties, tick the run option)
For Openbox, this is what I added in the section of the rc.xml file in /home/paul/.config/openbox:
a keybinding with Alt + F3 to execute /usr/bin/dmenu.sh
First, you’ll need to install dmenu. You can download the source code from the dwm/wmii website and install that (’sudo make clean install’ in Ubuntu). It's also in the repo's.
You need to add dmenu.sh script to /usr/bin with this
Code:
#!/bin/sh
exe=`dmenu_path | dmenu ${1+"$@"}` && exec $exe
Create a text file with this and call it dmenu.sh and don't forget to make it executable (right click, properties, tick the run option)
For Openbox, this is what I added in the section of the rc.xml file in /home/paul/.config/openbox:
a keybinding with Alt + F3 to execute /usr/bin/dmenu.sh
Here is a screenshot of dmenu running at the bottom of the screen in Openbox:
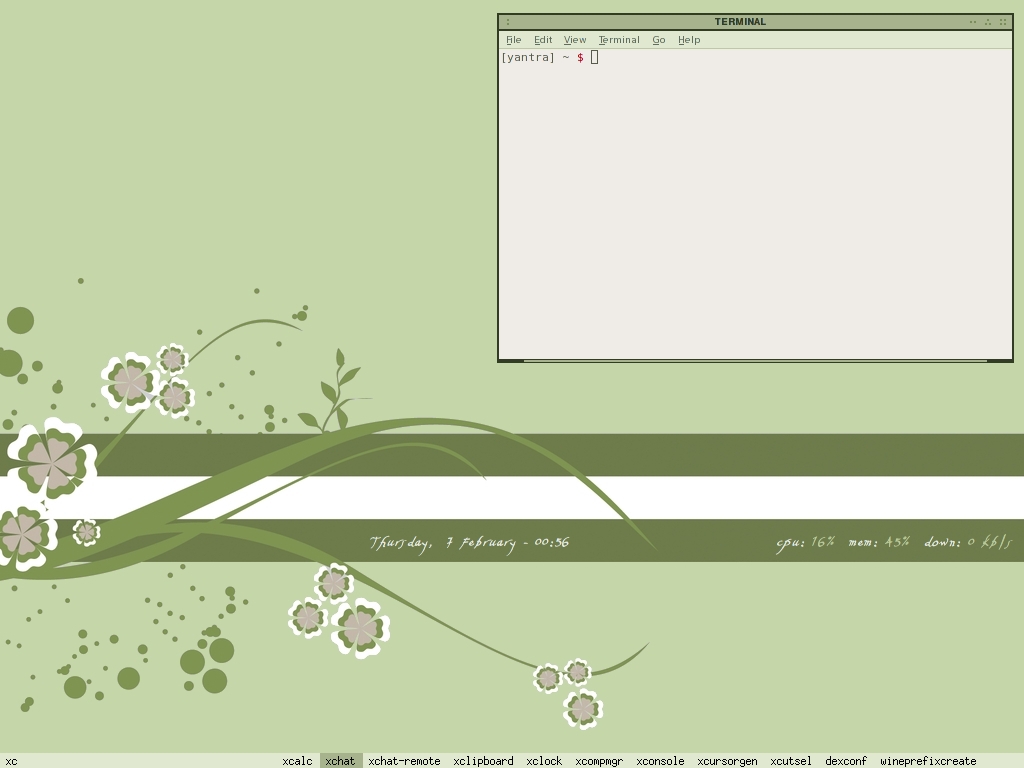
This solution found in a combo of this page: http://bbs.archlinux.org/viewtopic.php?id=57302 and this http://urukrama.wordpress.com/2008/02/07/using-dmenu-in-pekwm-and-openbox/
Openbox Logout, Reboot & Shutdown Script
I have been using the latest Openbox release [3.4.7-pre2] for the last few weeks and so far I have been impressed. One of the new features from the latest release is a GDM control script. The script basically allows for a user to send reboot and shutdown signals to GDM from within the Openbox environment. This provides a means to reboot/shutdown an Openbox system in a clean and efficient manner.

I have written the following PyGTK script to take advantage of the new GDM control. Python is not currently a language that I am too familiar with, so please feel free to rip the script to bits improve as you see fit.
#!/usr/bin/env python

import pygtk
pygtk.require('2.0')
import gtk
import os

class DoTheLogOut:

   # Cancel/exit
   def delete_event(self, widget, event, data=None):
       gtk.main_quit()
       return False

   # Logout
   def logout(self, widget):
       os.system("openbox --exit")

   # Reboot
   def reboot(self, widget):
       os.system("gdm-control --reboot && openbox --exit")

   # Shutdown
   def shutdown(self, widget):
       os.system("gdm-control --shutdown && openbox --exit")

   def __init__(self):
       # Create a new window
       self.window = gtk.Window(gtk.WINDOW_TOPLEVEL)
       self.window.set_title("Exit? Choose an option:")
       self.window.set_resizable(False)
       self.window.set_position(1)
       self.window.connect("delete_event", self.delete_event)
       self.window.set_border_width(20)

       # Create a box to pack widgets into
       self.box1 = gtk.HBox(False, 0)
       self.window.add(self.box1)

       # Create cancel button
       self.button1 = gtk.Button("Cancel")
       self.button1.set_border_width(10)
       self.button1.connect("clicked", self.delete_event, "Changed me mind :)")
       self.box1.pack_start(self.button1, True, True, 0)
       self.button1.show()

       # Create logout button
       self.button2 = gtk.Button("Log out")
       self.button2.set_border_width(10)
       self.button2.connect("clicked", self.logout)
       self.box1.pack_start(self.button2, True, True, 0)
       self.button2.show()

       # Create reboot button
       self.button3 = gtk.Button("Reboot")
       self.button3.set_border_width(10)
       self.button3.connect("clicked", self.reboot)
       self.box1.pack_start(self.button3, True, True, 0)
       self.button3.show()

       # Create shutdown button
       self.button4 = gtk.Button("Shutdown")
       self.button4.set_border_width(10)
       self.button4.connect("clicked", self.shutdown)
       self.box1.pack_start(self.button4, True, True, 0)
       self.button4.show()

       self.box1.show()
       self.window.show()

def main():
   gtk.main()

if __name__ == "__main__":
   gogogo = DoTheLogOut()
   main()
9 Responses to “Openbox Logout, Reboot & Shutdown Script”
-
uterrorista wrote,
Hi! Looks god to me. But, how do i run the script?? :D
-
Philip wrote,
Hi uterrorista
To create/run the script, copy it into a new file say,/usr/bin/openbox-logoutand make the file executable. You can then call the script from your Openbox menu or via the terminal withopenbox-logout— or whatever you named the file.I should also have mentioned that the GDM features are available in Openbox 3.4.7-pre2.
I personally choose for a keybinding in the rc.xml file:
Thursday, October 30, 2008
Set a custom shortcut to load an application
HOWTO : create a custom keyboard shortcut
In this case I want to use Alt + F2 to start gmrun, a very fine apps starter. I use it all the time when I'm using a Openbox session.
The goal of this HOWTO is to create a custom keyboard shortcut to run a software (like xmms, 3ddesk, ...) or what you want (xkill, transset 0.5, ...). In the example I want to start gmrun using "Alt + F2" shortcut.
1- Open GConf editor, go to apps -> metacity -> keybinding_commands, and now choose a command, for my example I choose command_1. Edit command_1 writing gmrun in order to run gmrun (or every command you want to launch).
2- In the same directory go to global_keybindings. Edit command_1 (or the command you choose in part 1) with the wanted shortcut like that :
+++++++++++++++++++++++++++++++++++++++++++++++++++
Another way to do this:
source:
http://www.linux.com/feature/59494
Start programs like a pro with XBindKeys
By Joe 'Zonker' Brockmeier on January 16, 2007 (8:00:00 AM)
Desktop environments like KDE and GNOME make it possible for you to assign keyboard shortcuts to a number of global operations, but don't make it easy to create shortcuts to run any program you'd like. To set up shortcuts for programs, XBindKeys is the way to go.
XBindKeys, as the name implies, binds keys to a command. It runs in the background and waits for you to run a shortcut that's defined in its configuration file. It handles virtually any key press (not just the modifier keys that your window manager recognizes) and is easy to set up.
Getting started with XBindKeys
I'm running XBindKeys on Ubuntu and Debian, which provide XBindKeys packages. Just run apt-get install xbindkeys xbindkeys-config as root, or using sudo, and you should be off to the races. Fedora Core 6 users (and possibly earlier versions) can run yum install xbindkeys to install XBindKeys -- though Fedora doesn't include the XBindKeys Config utility we'll talk about in a moment. If you're running Solaris, see the XBindKeys site for source and packages.
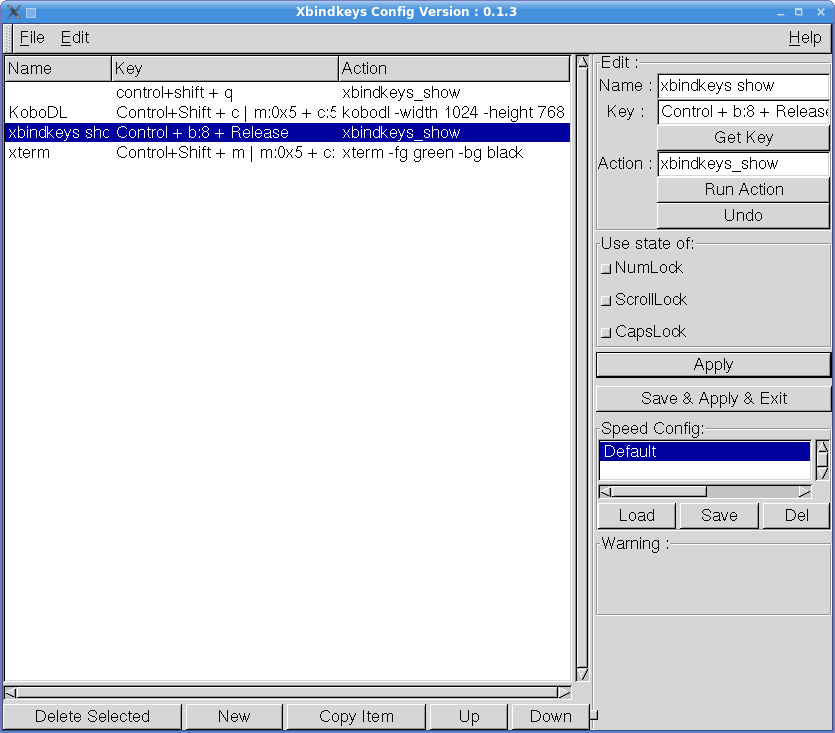 | |
| XBindKeys Config - click to view |
After installing XBindKeys, you'll need to generate a configuration file. The easiest way to do this is by running xbindkeys --defaults > $HOME/.xbindkeysrc, or just copying one of the example configuration files from /usr/share/doc/xbindkeys/examples to .xbindkeysrc under your home directory, if you're on a Debian or Ubuntu system.
With XBindKeys you have two ways to customize your configuration -- by hand-tweaking the configuration with a text editor, or by using the XBindKeys Config GUI utility. Let's take a look at the configuration format, and then we'll cover setting up commands using the GUI utility.
The basic syntax is very simple:
#Comment about the entry
"command"
Modifier + key
The first line is pretty obvious -- that's a comment that explains what the entry is. The comment is optional, but recommended. The second line includes the command you'd like to run when you use the shortcut. Finally, the third line provides the shortcut itself.
One of the nice things about XbindKeys, versus setting shortcuts in KDE or GNOME, is that you can also use mouse buttons in a shortcut. For instance, if you wanted to use Control plus the third mouse button to launch a program, you could use this entry:
#Mouse plus control launches gaim
"gaim"
Control + b:3 + Release
XBindKeys also accepts raw keycodes. If you wanted to use Ctrl-Shift-m to open an xterm, you could add it to the config file like this:
#Using keycodes
"xterm"
m:0x5 + c:58
The first part of the entry, m:0x5 is the modifier key -- in this case Ctrl and Shift pressed together. If you just press the Shift key, it would be m:0x1, and the Control key by itself would be m:0x4. The second part, c:58, is m by itself.
What if you don't know the keycode for a key or key combination? No problem. Run xbindkeys -k from a terminal (you'll need to see its output), and it will display a small dialog box. Make sure that box has focus, and press the key or keys that you want to get the output for. Let's say you press Ctrl-Shift-h; xbindkeys will provide output that's ready to cut and paste into your .xbindkeysrc, like this:
Press combination of keys or/and click under the window.
You can use one of the two lines after "NoCommand"
in $HOME/.xbindkeysrc to bind a key.
"NoCommand"
 m:0x15 + c:43
 Control+Shift+Mod2 + h
Now all you have to do is provide the command to be run in place of "NoCommand", reload xbindkeys, and you're ready to go.
If you prefer to go the GUI route, you can use the XBindKeys Config utility. Run xbindkeys-config and you'll see a window similar to Figure 1. Make sure that you've created a configuration file first or the utility will crash when you try to save your settings.
On the left side, you'll see all of the existing shortcuts. On the right side you can see the shortcut editor. At the bottom is the toolbar for working with existing shortcuts. Let's create a new shortcut by pressing New.
Now you'll see a new entry in the shortcuts pane, and the cursor will be placed in the Name field on the right side. Give the new shortcut a name, then press the Get Key button to assign a shortcut to the action. After you've assigned a shortcut, add the command you want to run to the Action field. Once you're happy with everything, click the Apply key and try out your shortcut. XBindKeys should run your command when you press the shortcut.
One thing to watch out for -- if you've assigned a shortcut that's already in use, you may not get the results you expect. I've tried assigning a number of shortcuts that conflict with global shortcuts that are already assigned under KDE. If that happens, you'll either need to change the shortcut, or reconfigure KDE's shortcuts.
After you've set up your shortcuts you can click the Save & Apply & Exit button and start using them. However, you need to restart xbindkeys anytime you modify its configuration file -- it won't re-read the configuration automatically. I usually just use killall -HUP xbindkeys.
Also, xbindkeys needs to be running in the background to work, so you will want to make sure it runs when X starts. The best way to do this, as long as you're logging in via KDM or GDM, is to put xbindkeys in your ~/.bashrc file.
With a little work up front, XBindKeys can make your life a lot easier. Give it a try and you'll be hooked in no time.
Subscribe to:
Posts (Atom)