Wednesday, July 30, 2008

Install OS without Floppy orCdDrive

http://unetbootin.sourceforge.net/

Introduction

UNetbootin allows for the installation of various Linux/BSD distributions to a partition or USB drive, so it's no different from a standard install, only it doesn't need a CD. It can create a dual-boot install, or replace the existing OS entirely.

Requirements

  • Microsoft Windows 2000-Vista, or Linux, or a USB Drive.
  • A broadband internet connection to download the distribution packages (unless installing from pre-downloaded media, see below)
  • Spare hard drive space to install the OS in (varies depending on distribution)

Features

UNetbootin can install to your local hard disk or make a bootable liveUSB drive. It can also load floppy/hard disk images, or kernel/initrds, or (some) ISO (CD image) files, for installing other distributions.


See also: http://marc.herbert.free.fr/linux/win2linstall.html

Wednesday, July 23, 2008

Make Wine Applications look better

Make WINE Apps Look Better

How to Make WINE Apps Look Better
By Dan "quandar" Rise


Introduction:
Well, we all know if you leave WINE at its general configuration it is quite ugly, and if you use the .msstyle option in winecfg it makes everything slow, and its buggy at best. This guide is not set out to perfectly replicate your GTK theme, but hopefully make it blend.
First this guide will assume you have a fully functioning WINE setup. If you have that then lets get on with it, pick these apps (that we will use WINE to run) up.

Apps You Will Need:
Install Your Apps:
This step is fairly simple enough, unzip both of those ZIPs to folders and run the Setup.exe on both of them. Basicaly press agree, next, next, you know, Windows style *wink*.

DisplaySet / Fonts:
Open Nautilus, and press CTRL+L and type ~/.wine and go from your root windows folder (on mine it is "drive_c") and Program Files > DisplaySet, and open DisplaySet.exe. And switch all your font settings to your fonts in you System > Preferences > Font menu.


3DCC / Colours:
Navigate to ~/.wine//home/quandar/.wine/drive_c/Program Files/JaSMiN Co/3D Color Changer 4 and open Js3Dcc.exe with WINE. Okay, as a base for making a similar theme download a 3DCC pack from this site. Basically after this point install it in 3DCC and modify your colours accordingly using the RGB section under the example window for a perfect match. Keep in mind don't use the capture eyedropper feature, it generally is buggy going again anything outside the WINE window.
P.S. I chose Inspire Orange.

source: http://ubuntuforums.org/showthread.php?t=142741

Install Exact Audio Copy (EAC) under WINE


source: http://ubuntuforums.org/showthread.php?t=142784

Run Exact Audio Copy (EAC) on Linux

Introduction
Hands down, it is often agreed that EAC is the best CD ripper out there. And it was one of the things I took for granted when I switched. So basically, I set out to use it using WINE, and really, its just as fast, and runs perfectly, no problems in any feature from what I can see.


(If you want to make WINE look better without msstyles read this guide.)

Configuring WINE: Part I
Open your terminal in type in:
Code:
winecfg
And go to the "Drives" tab, and press the "Autodetect..." button.
It should scan for drives, and find a handful of them. Find /media/cdrom drives, if you have more than one then apply this step to all of them. Click on the drive letter ( in my case E: ) and press the "Show Advanced" button, and then select the "Type" of the drive to be "CD-ROM", apply to every drive that is a CD drive, and press "OK".

Installing EAC
Download the installer for Exact Audio Copy, then double-click eac-0.95b4.exe on the downloaded file and simply install like any other app.

Configuring WINE: Part II
Go into your terminal and type:
Code:
winecfg
and in the Applications tab, press the "Add Applcation" button and browse to EAC.exe, and click on it and select a NT operating system from the Windows select box (those being NT/2000/XP), and press "OK".
As it launches cancel the wizard, and press F9, and under the "Interface" tab, select "Native Win32 Interface for NT/2000/XP". Press "OK", and restart the app. Put a CD in your drive, and hopefully all will go well.
You should now be able to simply launch by using
Code:
wine ~/.wine/drive_c/Program\ Files/Exact\ Audio\ Copy/EAC.exe
in your favorite terminal.

Tuesday, July 22, 2008

February 2nd, 2008

Someone asked me this recently. I don’t have just one answer. I compiled a list of things I thought of and emailed it to my friend…then I thought I would post it here for future reference. Feel free to add to the list! There is also a forums thread on the same topic, that I remembered as I complied my thoughts, so I stole some of the ideas posted there.

1. Upgrade to the newest version legally and without paying money
2. Have the latest version of the operating system run faster than the previous version on the same hardware
3. Easily install and run different graphical interfaces if I don’t like the default setup
4. Install twenty programs with one command
5. Have the system automatically update all my installed programs for me.
6. Install the same copy of my OS (Ubuntu) on multiple computers without worrying about license restrictions or activation keys
7. Give away copies of the operating system and other programs that run on it without breaking any laws, governmental or ethical or moral, because it was all intended to be used this way
8. Have full control over my computer hardware and know that there are no secret back doors in my software, put there by malicious software companies or governments
9. Run without using a virus scanner, adware/spyware protection, and not reboot my computer for months, even when I do keep up with all of the latest security updates
10. Run my computer without needing to defragment my hard drive, ever
11. Try out software, decide I don’t like it, uninstall it, and know that it didn’t leave little bits of stuff in a registry that can build up and slow down my machine
12. Make a major mistake that requires a complete reinstallation and be able to do it in less than an hour, because I put all of my data on a separate partition from the operating system and program files
13. Boot into a desktop with flash and effects as cool as Windows Vista on a three year old computer…in less than 40 seconds, including the time it takes me to type my username and password to login
14. Customize anything I want, legally, including my favorite programs. I can even track down the software developers to ask them questions, contribute ideas, and get involved in the actual design/software writing process if I want to
15. Have 4+ word processor windows open working on papers, listen to music, play with flashy desktop effects, have contact with a largely happy community and have firefox, instant messaging, and email clients all open at the same time, without ever having had to beg someone for a code to make my os work, and without the system running so slow it is useless
16. Use the command “dpkg –get-selections > pkg.list” to make a full, detailed list of all software I have installed, backup my /etc and /home directories on a separate partition, and you are able to recover your system any time, easily
17. Run multiple desktops simultaneously, or even allow multiple users to log in and use the computer simultaneously
18. Resize a hard disk partition without having to delete it and without losing the data on it
19. Use the same hardware for more than 5 years before it really needs to be replaced…I have some hardware that is nearly 10 years old, running Linux, and still useful
20. Browse the web while the OS is being installed!
21. Use almost any hardware and have a driver for it included with the operating system…eliminating the need to scour the internet to find the hardware manufacturer’s website to locate one
22. Get the source code for almost anything, including the OS kernel and most of my applications

source:

http://matthewhelmke.net/wordpress/2008/02/02/what-is-the-coolest-thing-you-can-do-using-linux-that-you-can-t-do-with-windows-or-on-a-mac/

Comment:

great list

I just love X11Forwarding
ssh -X -C1 mydesktopIP -l username
means I can run any app on my new EeePC that’s installed on my desktop and it will open/save on my desktop.
Don’t even type a password if you use "ssh-keygen -t rsa". So if I lose my laptop I wont lose any important data.

Disabling Compiz

As I keep having freezes and lockups I try to disable Compiz:

source: http://www.ubuntu1501.com/2008/04/stop-compiz-fusion-from-loading.html

Stop Compiz-Fusion From Loading Automatically

This guide will show you how to stop Compiz-Fusion from loading automatically on startup in Hardy Heron and how to setup a shortcut for launching Compiz when you want.

Step 1: Run gconf-edit
Start Run Application by pressing Alt+F2

Screenshot-Run Application

Enter gconf-editor into the box, hit enter


Step 2: Set Metacity as your default start up window manager
Once in gconf-editor navigate to desktop>gnome>applications>window_manager

Screenshot-Configuration Editor - window_manager

under current and default replace each instance of:
/usr/bin/compiz with /usr/bin/metacity
it should like this when you're done:

Screenshot-Configuration Editor - window_manager-1


Step 3: Create a shortcut for starting Compiz-Fusion
right click the Applications Places System Menu
select the Edit Menu option

Screenshot-Main Menu

pick a location for your shortcut and select New Item box

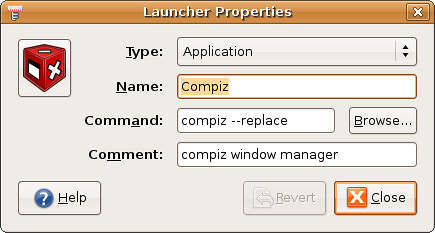
Screenshot-Launcher Properties
Type: Application
Name: Compiz
Command: compiz --replace
COmment compiz window manager

Note 1:
Running
metacity --replace
will temporarily stop compiz, then running
compiz --replace
will enable it again. I use this to temporarily disable compiz

Note 2: For all users
Incase your using this to disable compiz system wide (eg, its causing crashes for all users) you can do this instead:

run `gksu gconf-editor`
change the same values (remembering when you set them to use "string")
right click them and select "default" and "manditory"
Now the change should affect all users.

Monday, July 21, 2008

Tool to scan and search your media and hard disks

CDCat is a graphical, multiplatform media catalog program which scans the directories/drives you specify and makes a list of the filesystem contents (including the tags of MP3 files) and stores the result in a gzipped XML file.

http://www.linuxappfinder.com/package/cdcat

uTorrent under Ubuntu in 3 Easy Steps

By: Marius Nestor, Linux Editor

These days, BitTorrent is the most popular P2P (peer-to-peer) file distribution protocol. Whether you want to share some files or you just want to get your hands on the latest Linux distributions, then you must use a BitTorrent client.
There are many BitTorrent clients for Linux, starting with the old and classical BitTorrent (yes, just like the protocol) and ending with the brand new Deluge, and somewhere in the middle we can enumerate very popular BitTorrent clients like Azureus, Transmission or rTorrent, each one providing very interesting features and functionality.

On the other hand (and this is what we're gonna talk about today), if you have "Windows friends", you must have heard them talking about that very tiny and light BitTorrent client called uTorrent. uTorrent is (of course) a BitTorrent client, with impressive features, like faster download speeds, intelligent configurable disk caching, trackerless support and lighter than any other P2P client out there. Now, you have Linux that is a Windows application, what do you do? Very simple, follow the instructions below!

Step 1 - Install Wine

Open a console and type:

CODE

sudo aptitude install wine


Step 2 - Create uTorrent executable script

CODE

sudo gedit /usr/bin/utorrent


A text editor will open, just paste in the following lines. Remember to leave a blank line after the code below!

CODE

#!/bin/sh
cd ~/utorrent/
if [ "$1" != "" ]; then
var="`echo $1 | sed 's////g'`"
var="Z:${var}"
wine utorrent.exe "$var"
else
wine utorrent.exe
fi


Save and close. This will create a script in your /usr/bin/ folder. You still need to make this script executable, so type the following command in a console:

CODE

sudo chmod a+x /usr/bin/utorrent


Now create a folder called utorrent in your home directory, then download the latest version (Standalone, NOT the installer) of the uTorrent application from Softpedia and place it in the folder you've just created.

Step 3 - Create Desktop Shortcut

In this final step, we're gonna create a desktop shortcut for the uTorrent script above, so you don't have to type any command at all.

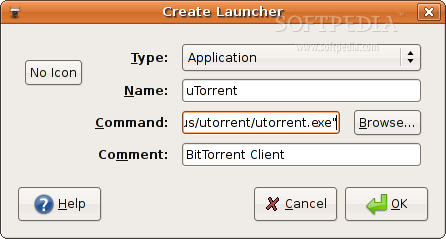
Right click on your desktop and go to "Create Launcher...". On the new launcher window, fill the fields as follows:

Type: Application
Name: uTorrent
Command: wine "/your-home-directory/utorrent/utorrent.exe"
Comment: BitTorrent Client

See screenshots below:

Create Launcher example

Note: Replace "your home directory" in the Command field above, with /home/your-name (e.g. /home/marius)

Choose a suitable icon, and click OK. Now all you have to do in order to enjoy uTorrent is to double click on the uTorrent icon on your desktop. Great thing is that you will also have a tray icon.

Sunday, July 20, 2008

CoLininux a new way of Linux virtualization

If you finally did the plunge and installed Linux on your hard drive, you notice that nothing beats that experience. Still lot of folks use their pc as a productive tool, that they can't rik to be messed up (not that this will happen, but the fear of this prevents experimenting).
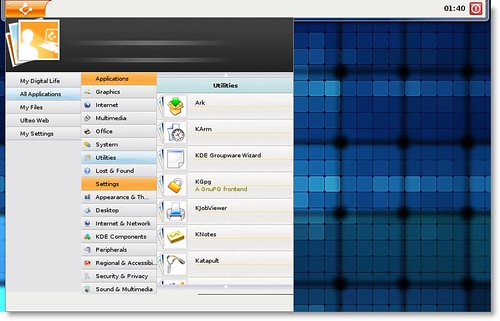
Comes in this new way of virtualization that seems to beat VMware in unsability and speed..virtual desktops with coLinux (Cooperative Linux) kernel. What sets these virtual machines apart from traditional virtual installation is it’s speed, which runs almost as good as a native installation; as it get full control of host machine hardware. Cooperative Virtual Machine (CVM) is a rather new development and is not as widely adopted or used by the linux community, yet. You can find a small list of linux distro using coLinux kernel, here. Ulteo is one of them , and it works great; it is a plug and play Ubuntu-derived coLinux distribution that provides hundreds applications out of the box, has very easy installation and works on XP and Vista (32-bit only). Check out ulteo for yourself, here.

Here is Ulteo in action:

source: http://www.linuxhaxor.net/2008/06/16/3-ways-to-try-out-linux-for-a-windows-user/

Saturday, July 19, 2008

Graphical Hard Disk Usage Tool

What is filling up your hard disk?

How To Check Hard Drive Disk Space

For Window users switching to Linux or Ubuntu, performing simple tasks can be a challenge. One simple task such as checking free and used hard drive disk space on Ubuntu, is easy using the graphical utility Disk Usage Analyzer or from a Terminal window using the command df.

Checking Disk Space From Gnome and Kubuntu

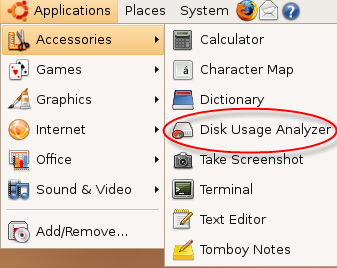
Disk Usage Analyzer is a graphical menu driven application that reports disk usage in Gnome and Kubuntu environments. DUA can scan the entire file system tree or individual directories, either local or remote. DUA is also dynamic, in that it will report in real time any devices that are mounted and unmounted.

To access Disk Usage Analyzer in Gnome, click on Applications \ Accessories \ Disk Usage Analyzer

ubuntudisk1.png


I used Treesize a lot in XP. This is quite a different tool but just as useful.
Filelight is another program for doing this: you can find it in Add/Remov Programs
http://linuxappfinder.com/package/filelight

Kill a process with and without windows

With windows
Way 1:
Press Alt+F2, type xkill and click on Run. Your cursor changes in a cross. Select the window you want to close. Click on it, it will close.

Way 2:
This requires some preparation but this is much easier if it happens frequently that one of your applications freezes. First, right-click on your panel (usually on top and on the bottom of your screen). Select "Add a button". Select the Force Quit button in the Desktop and Windows section. Click on Add and click on Close. The force-quit button is added to your panel. If you want to close a non-responding (frozen) application, click on the button first. You should then be able to close an application by clicking on it.
source: http://www.howtodude.net/howto/view.article.php/165
Great site with lots of useful suggestions for the Linux Newbie

Kill a process without Windows
Ever wanted to restart Firefox and got the message: "Firefox is still running. Stop it or restart your computer" ?But no window to be found? Well, you won't have to restart your pc.
You can check running processes with typing in terminal:
ps -e
It will show you all running processes.
Good to know and maybe find the exact process name you're looking for.
We want to stop Firefox running, have seen it in the list.
Type in terminal
pkill firefox
That will do the job and you can restart firefox again.

Friday, July 18, 2008

How to move a window to another desktop

How to move a window in Ubuntu:

Way 1: Put your mouse pointer on the title bar of your window and press your mouse button. While it is pressed in, you can move it. If you keep moving it to the left or the right, it will eventually end up in another workspace.

Way 2: The same as way 1, only now you move your mouse pointer to any place in a window. Press Alt and click your mouse button.

GNOME Keyboard Shortcuts

Super(=windows key)+e
Opens Expo tool

Alt + F1
Opens the Applicantions Menu .

Alt + F2
Displays the Run Application dialog.

Ctrl + Alt + right arrow
Switches to the workspace to the right of the current workspace.

Ctrl + Alt + left arrow
Switches to the workspace to the left of the current workspace.

Ctrl + Alt + d
Minimizes all windows, and gives focus to the desktop.

F1
Starts the online help browser, and displays appropriate online Help.

Window Shortcut Keys

Alt + Tab
Switches between windows. When you use these shortcut keys, a list of windows that you can select is displayed. Release the keys to select a window.

Alt + Esc
Switches between windows in reverse order. Release the keys to select a window.

Application Shortcut Keys
Command Meaning
Ctrl + N New
Ctrl + X Cut
Ctrl + C Copy
Ctrl + V Paste
Ctrl + Z Undo
Ctrl + S Save
Ctrl + Q Quit

Edit Shortcuts: System, Personal Settings. Shortcuts:
http://www.novell.com/coolsolutions/feature/16032.html

How to move to a folder fast in the terminal

Assuming that the folder is placed in home directory you type

cd /home/the_name_of_the_folder_you_want_opened

You can work around the space in the folder name by using quotes:

cd "saya lagi"

- Or you can "escape" any special character by putting a \ before it:

cd saya\ lagi

- Or just make use of the autocomplete feature using the tab key:

Type: cd sa and then just press the tab key so that linux can automatically complete the line for you. This only works if there are no other folders that begin with the letters "sa", else you should try "cd say" and tab or "cd saya" and tab, etc. If you press tab twice you'll get a list of possible folder names.

You can also drag a long named folder in the terminal and type cd before the name; use Ctrl+a to move the cursor to the beginning of the line.

Lastly, in case you use regular ubuntu (Gnome/nautilus) you can install the package nautilus-open-terminal, that will allow you to right-click a folder and start a terminal from there.

Thursday, July 17, 2008

Installing the Perl Audio Converter Ubuntu

PACPL is a Perl based script for converting audio files. It is extremely powerful and is capable of encoding/decoding a large array of formats (aac, ac3, avi, divx, flac, m4a, mp3, mp4, mpeg, ogg, raw, shn, vcd, vob, wav, wma, wmv and many more). Installing the program itself is fairly easy but it does require a number of dependencies – this is what causes most people problems. This tutorial will show how to install PACPL, the dependencies, and codecs. To start with you need to make sure that you have all the repositories and codecs installed.
There are lots of How To's so if you get stuck on these just search in the forum threads.
  1. Install the Medibuntu repository https://help.ubuntu.com/community/Medibuntu.
  2. Follow these instructions for adding repositories and packages in Ubuntu https://help.ubuntu.com/community/InstallingSoftware
  3. Install the Ubuntu Restricted Extras https://help.ubuntu.com/community/RestrictedFormats
  4. Install “Build Essential” from Synaptic (or use apt get or aptitude get – whatever method you prefer)
.

Now you are ready to install PACPL.
  1. Go to the PACPL web site and download the source package to your desktop http://pacpl.sourceforge.net//. As of this writing the latest package is pacpl-4.0.1.tar.bz2.
  2. Extract the pacpl-4.0.1.tar.bz2 package to the desktop (right click>extract here).
  3. In the pacpl-4.0.1 folder is a folder called “extras”. This contains the script for installing all the dependencies. To run the script, open a terminal and change directories to the pacpl-4.0.1/extras folder on your desktop.
    Code:
    cd /home/yourusername/Desktop/pacpl-4.0.1/extra
    (where yourusername is your user name in Ubuntu).
  4. Next run the script that will install all the dependencies. At the terminal prompt type (or cut and paste):
    Code:
    ./mod-install-kubuntu.sh
  5. Once that is finished change directories again:
    Code:
    cd /home/yourusename/Desktop/pacpl-4.0.1
  6. Type or cut and paste the following commands at the prompt (1 line at a time).
    Code:
    ./configure
    Code:
    make
    Code:
    sudo make install

That's it. To run pacpl, open a terminal and type:
Code:
pacpl --longhelp
This will give display the list of commands available and instructions for using PACPL. In general, the commands are written in the following structure

Open a terminal and at the prompt type:
Code:
~$pacpl --to   directories/files
So for example I have a music file xyz.flac in my Home/music directory and I want to convert it to mp3. At the prompt I type:
Code:
cozmicharlie@ubuntu:~$ pacpl --to mp3 Home/music/xyz.flac
Hit enter and the file is converted to xyz.mp3.

There are a number of options including moving the file to a new directory, overwriting the original, tagging (you can tag and convert at the same time). See the pacpl --longhelp for all the commands.
source: http://ubuntuforums.org/showthread.php?t=712064

Root privileges in Ubuntu no root password

Root Sudo

In Linux (and Unix in general), there is a superuser named root. The Windows analog of root is Administrator. The superuser can do anything and everything, and thus doing daily work as the superuser can be dangerous. You could type a command incorrectly and destroy the system. Ideally, you run as a user that has only the privileges needed for the task at hand. In some cases, this is necessarily root, but most of the time it is a regular user.

By default, the root account password is locked in Ubuntu. This means that you cannot login as root directly or use the su command to become the root user, however, since the root account physically exists it is still possible to run programs with root-level privileges. This is where sudo comes in; it allows authorized users (normally "Administrative" users; for further information please refer to AddUsersHowto) to run certain programs as root without having to know the root password.

This means that in the terminal you should use sudo for commands that require root privileges; simply prepend "sudo" to all the commands you would normally run as root. For more extensive usage examples, please see below. Similarly, when you run GUI programs that require root privileges (e.g. the network configuration applet), you will also be prompted for a password. Just remember, when sudo asks for a password, it needs YOUR USER Password, and not the root account password.

source: https://help.ubuntu.com/community/RootSudo

Wednesday, July 16, 2008

Install Tutorial: Adding Ubuntu to XP


How to dual-boot Windows XP and Linux, on a system where you have already installed XP. Easy step-by-step tutorial that doesn't assume prior knowledge of Linux.


http://apcmag.com/how_to_dual_boot_windows_xp_and_linux_xp_installed_first.htm?page=3

Sunday, July 13, 2008

RubyRipper, Linux's EAC

Get it here: http://getdeb.net/app/Rubyripper
(older version 0.50)

Rubyripper is a digital audio extraction algorithm that uses cdparanoia in a sophisticated way to make sure that a CD rip is done successfully and accurately. It is very similar to and inspired by EAC. Rubyripper is written in the ruby programming language.
http://wiki.hydrogenaudio.org/index.php?title=Rubyripper

Features

* A GTK2 user interface
* Sophisticated error correction mechanism
* A command line interface (CLI) available
* CDDB-info is fetched via the cd-discid module
* Info can be edited after fetching
* The codecs supported are FLAC, Vorbis, MP3, and WAV
* Multiple codecs can be used in one run
* Direct offset support
* Detailed logfile creation
* A detailed overview of hard-to-correct positions
* Create m3u playlists

Installation tips :
Install on Ubuntu 8.04 plus newest version 0.51:
http://ubuntuforums.org/showthread.php?t=799621
New in 0.51:
What's New in This Release:

· important fix that prevents creating corrupted wav files
· move over to one single language file
· make ruby-gettext optionally
· single file ripping supported
· cuesheet support

Configuration tips:
http://filesharefreak.com/tutorials/rubyripper-native-secure-cd-ripping-on-linux/

Which Linux program replaces which M$ Windows program?

To be able to find replacement of the software you're used to this site of offering equivalents comes very handy. Be aware that some programs are better suited for your distro or desktop program (KDE, Gnome or XFSE) than others:
http://www.linuxappfinder.com/

Saturday, July 12, 2008

Split lossless audio (ape, flac, wv, wav) by cue file in Ubuntu

source:

http://aidanjm.wordpress.com/2007/02/15/split-lossless-audio-ape-flac-wv-wav-by-cue-file/

[only convert without splitting here ]


Lossless audio files can be split by cue file using “shnsplit” (part of the “shntool” package). You will also need the “cuebreakpoints” tool (part of the “cuetools” package). To install cuetools and shntool in Ubuntu/ Kubuntu, open a terminal window and enter the following:

sudo aptitude install cuetools shntool

You will also need software for your prefered lossless audio format. For Monkey’s Audio you need to install “mac” - see here for details. For FLAC and WavPack formats you need to install “flac” and “wavpack” respectively:

sudo aptitude install flac wavpack

Shnsplit requires a list of break-points with which to split an audio file. Conveniently, cuebreakpoints prints the break-points from a cue or toc file in a format that can be used by shnsplit. You can pipe the output of cuebreakpoints to shnsplit as follows:

cuebreakpoints sample.cue | shnsplit -o flac sample.flac

In this example, a flac file called “sample.flac” is split according to the break-points contained in “sample.cue” and the results are output in the flac format.

The output file format is specified via the “-o” option. If you don’t specify an output format your split files will be in shntool’s default format (i.e., wave files, “wav”).

To split a monkey’s audio file by cue file and output the results in the flac format:

cuebreakpoints sample.cue | shnsplit -o flac sample.ape

Note that a default prefix “split-track” is used to name the output files. (The default output format is split-track01, split-track02, split-track03, …). You can specify your own prefix via the “-a” option.

To see all the options for shntool split type “shntool split -h” or “shnsplit -h”.

Transferring tags

The audio files output by shnsplit do not contain tag data. However you can use the “cuetag” script (installed as part of the cuetools package) to transfer tag data directly from a cue file to your split audio files. You specify the individual audio files corresponding to the tracks contained in your cue file as follows:

cuetag sample.cue split-track01.flac split-track02.flac split-track03.flac split-track04.flac

This will transfer the tag data contained in “sample.cue” to the flac audio tracks “split-track01.flac” “split-track02.flac” “split-track03.flac” and “split-track04.flac”.

The above command could be streamlined as:

cuetag sample.cue split-track*.flac

Cuetag works with flac, ogg and mp3 files. The cuetag script is not currently able to handle file names containing spaces.

Note: If you are running flac version 1.1.4 or higher then you may need to make some small changes to the cuetag script before it will work correctly with flac files. Open the cuetag script (for Ubuntu installations it will be located at /usr/bin/cuetag) in a text editor and make these two changes: 1) search for the text “remove-vc-all” and replace it with “remove-all-tags”. 2) search for the “import-vc-from” and replace with “import-tags-from”.


Also see:

http://aidanjm.wordpress.com/2007/01/26/using-monkeys-audio-ape-files-in-ubuntu/


There you see you can convert image.ape to image.flac using

shnconv -o flac image.ape

Or an alternative to using shntool is to work via the mac and flac programs directly; to convert a monkey’s audio file to flac:

mac sample.ape sample.wav -d
flac -o sample.flac sample.wav
======================
Addition
What I usually do is batch processing to convert them to flac using pacpl audio conversion library:

> cd ~/yuckyapes
> pacpl -r -o ape -t flac *
.
. Test!
.
> find . -name '*.cue' -exec sed -i 's/\.ape/\.flac/' {} \;
> find . -name '*.ape' -exec rm {} \;

courtesy:Tri
=======================
first step: move in terminal to the folder where the ape file is,
2: convert image.ape to image.flac;
3: test the flac file;
4, rename image.ape to image.flac in the cuesheet;
5: remove the ape file.

A tutorial to install and use pacplin Ubuntu:
http://ubuntuforums.org/showthread.php?t=712064

Super key

Some slang is so natural to the common folk that everybody forgets to explain:
so the Super key is what in that M$ world is called the windows key.

So for example GnomeDo is activated by Super + Space..
(GnomeDo: http://do.davebsd.com/ Video tutorial )

Solution Ubuntu 8.04.1 freezes or locks up

Three problems are often noted:
System freezes often running Firefox 3 with Flash?
I tried this, gave some results but didn't fix the problem totally.
Deinstall completely all Flash components not only Flash, but also libswfdec and the swfdec-mozilla plugin with Synaptic packet manager.

Go to http://labs.adobe.com/downloads/flashplayer10.html
and download Flashplayer 10beta or search a newer one when available...
Install it by doubleclicking the install file.
++++++++++++++++++
This problem also may lead to unwanted closing of Firefox:

Aim:

If Firefox 3 closes down each time you visit certain sites, it may be because you have two flash movie players installed in Ubuntu. Uninstall one flash player to stop Firefox 3 from closing down.

How to stop Firefox 3 from closing down on some sites:

Go to System > Administration > Synaptic Package Manager and search for "flash". Check if both Gnash and Adobe Flash Player plugin ("flashplugin-nonfree") are installed. If this is the case, mark one for complete removal and click on Apply.
++++++++++++++++++++++++

Edit: This doesn solve the problem totally as after 10 minutes of Youtube the system froze again, but otherwise the problem is less severe...

Edit2: When I try to write a comment in Firefox 3 the system freezed too today.
Strange that even the SysRq+ alt +b didn't work to reboot..

Second cause: wireless connection interfering


Edit3 and temorary solution: I read that it might have something to do with my wireless and non wireless connection interfering with each other.
Use the command to find out what is working on your pc:
ifconfig
In my file /etc/network/interfaces I could only find:
auto lo
iface lo inet loopback
So I added the lines:
auto eth0
iface eth0 inet dhcp
wlan0 wasn't mentioned in my file.

How to edit your interfaces file:
sudo kwrite /etc/network/interfaces
( KDE )
sudo gedit /etc/network/interfaces
(Gnome)
sudo gedit /etc/network/interfaces
(XFCE)
sudo nano /etc/network/interfaces
(all ,save with Ctrl+ O and Ctrl + x quit).

Cause 3: A restricted ATI Video Driver


Edit4: Another reason that was given for lockups are the restricted ATI Video Driver.
I used the following tutorial to updat this one following method 2.
It looks far more complicated than it is to follow these instructions:
http://wiki.cchtml.com/index.php/Ubuntu_Hardy_Installation_Guide

source: http://forum.ubuntu-nl.org/topic/24231

Essentail skills: installing software

source: http://monkeyblog.org/ubuntu/installing

Quote:

How to install ANYTHING in Ubuntu!

A graphical guide for all new users with a Windows background using Ubuntu Revision 4


Having problems installing something on your new Ubuntu operating system? "Where's the EXE?", "Where do I need to extract this to?", "How do I run it?", "Where did it go?" - have you been thinking questions like these? Don't worry, installing software, themes and other things on Ubuntu is actually very easy! This guide will help you understand with screenshots, instructional videos and to-the-point language.


How to Install Anything in Ubuntu Condensed

source: http://martin.ankerl.com/2007/04/19/how-to-install-anything-in-ubuntu-condensed/

This is a very condensed excerpt of the excellent article How to install ANYTHING in Ubuntu.

Search, install, remove available packages (preferred method)

sudo aptitude search ABC
sudo aptitude install ABC
sudo aptitude remove ABC

.deb (you have to take care of dependencies on your own)

sudo dpkg -i ABC.deb

.rpm (requires sudo aptitude install alien)

sudo alien -i *.rpm

.tar.gz (requires sudo aptitude install checkinstall)

tar xzvf ABC.tar.gz
cd ABC
./configure
make
sudo checkinstall

.package, .sh, .bin (Just download and execute)

chmod +x ABC
./ABC

.exe (requires sudo aptitude install wine)

wine ABC.exe

Essenstial skills:navigating the terminal

The standard terminal on Ubuntu is Gnome Terminal which can be found in Applications → Accessories → Terminal. A terminal is in a way very similar to a file manager in that it's always inside a specific folder and is able to navigate to other folders and do regular file management. By default it will be inside your home folder when you run it. To confirm that your terminal is indeed browsing your home folder, type pwd ending with a press on enter. The pwd command will output the path to the current folder.

To see a list of files and directories inside the current directory, run the command ls. If you want to navigate up the directory tree run cd ... If you want to navigate down the directory tree run cd NAME where NAME is the name of the folder you want to navigate to. Example: if Tom is inside his home folder and there's a directory called test inside it, he will run cd test to change directory. If he wants to go back he can run cd ... If he ever gets lost he can run cd by itself; this will take him back to his home folder.

--------------------------------------

Cursor Movement

You can navigate with the cursor using the same keystrokes as you would use in Emacs. A few examples:

C means the "Ctrl" key. M means the "Alt" key (meta key). Often the Ctrl key will act on one character (or smaller unit) and the Meta key (Alt) will act on one word (or larger unit).

  • C-f — Forward one character.
  • C-b — Backwards one character.
  • M-f — Forward one word.
  • M-b — Backwards one word.
  • C-a — Move to the beginning of the line.
  • C-e — Move to the end of the line.
  • C-d — Delete one character.
  • M-d — Delete one word.

You can also highlight text and use Ctrl-Shift-c to copy, and Ctrl-Shift v to paste (at least in GNOME Terminal in Ubuntu).

Scrolling the Terminal

To scroll the terminal text, use Shift-PageUp and Shift-PageDown. In GNOME terminal you can also use the mouse wheel to scroll.

Terminal History

Your computer stores a history of commands that you type. You can use the up arrow key or down arrow key to navigate through your history.

You can view your history by typing history in the terminal.

You can search for a previously typed command by using the key combination C-r (which means "reverse search" in Emacs).

You can also use grep to find previously typed commands like this: history | grep "search words here"


Excellent tutorial here:

http://ubuntuforums.org/showthread.php?t=73885

Friday, July 11, 2008

Graphical Bootloader


If you don't want to change you Master Boot Record and have a floppy drive, you can use the the GAG bootloader.
Also very handy if you want very extended boot possibilities:
http://gag.sourceforge.net/

How to reboot or shut when Linux system freezes?

After I press ctrl alt F2 and it drops me into the manual login.
Alternately you can use Ctrl+Alt+Backspace to restart X and return to the login screen.
Carrying on with Ctrl+Alt+F2 method, just login to the VT session and type in
Code:
sudo killall appname
Then return to your X session (Ctrl+Alt+F7), then continue with your duties.


Another alternative is to restart X (the graphical interface). When X freezes, simply push ctrl-alt-backspace. This will restart X without restarting the computer, then you can login again. Be aware though that you lose any unsaved data in any open applications.

If ctrl-alt-backspace won't do anything you can use a terminal (getting to it as you described) and then after login issuing

Code:
sudo /etc/init.d/gdm restart
If that doesn't do the trick either (which is rare) you can raise a skinny elephant. It's a silly name for a simple meme.

Hold down alt + SysRQ (often also labeled Print Screen) and press the following keys in order:

R - raising (switches keyboard from raw mode)
S - skinny (sync all mounted filesystems)
E - elephants (shuts down all processes except init)
I - is (terminates all processes except init)
U - utterly (remounts all filesystems in read-only mode)
B - boring (immediately reboots the system)

This is for when nothing else works.

Other description:

Should your system completely lock up, and you need to do a hard reboot - do this instead. It works by sending signals directly to the linux kernel, to unmount all partitions, kill processes, etc, relatively safely:

Holding ALT, tap [sys rq], r, e, i, s, u, b.

Wait a couple seconds between each of the letters to ensure it finishes the operations before starting the next. ‘b’ causes a reboot, so no need to touch the power button. On laptops like mine, you may need to hold the [fn] button while hitting [sys rq] - don’t hold it for any other buttons.


//////////////////////\\\\\\\\\\\\\\\\\\\\

Shutting down from the terminal:
Code:
sudo init 0

source: http://ubuntuforums.org/showthread.php?t=851434

Wht is the SysRq key?
source: http://en.wikipedia.org/wiki/Magic_SysRq_key

Keyboard shortcut (compare to Ctrl+Alt+Del in Windows):
Shut of the system: Alt + SysRq + o
Reboot the system: Alt + SysRq + b
SysRq is on my keyboard the same key as Prt Scr (Print Screen).

Thursday, July 10, 2008

Supergrub makes Grub a supertool

Supergrub ( http://www.supergrubdisk.org/index.php ) is the ideal tool for managing boot up problems or managing your anxieties about them.
After my first Linux install some 5 years ago (using Lilo as boot manager) my pc wouldn't boot again at all, nor the linux install nor the windows xp; I used FixMBR.exe but should have used supergrub, because then I would have been able to access my linux install.

Anyway Supergrub is a great tool and I got a webpage it deserves here:
http://users.bigpond.net.au/hermanzone/SuperGrubDiskPage.html
Citation:
Situations where Super Grub Disk is useful:
Even if your computer has no bootloader problems right now, it is still a good idea to keep a Super Grub Disk somewhere around your computer for an emergency. All good system administrators should have one.

Super Grub Disk can boot up a computer when the 'IPL' (Initial Program Loader) code in the MBR does not point to the partition with the operating system that the user wants to boot up.
For example, when someone is dual booting Windows with a Gnu/Linux operating system and they have to re-install Windows. Now the computer will only boot Windows. Super GRUB Disk features the fastest and easiest way to re-install GRUB to MBR.
Super Grub Disk can also write other bootloader codes to MBR for you, from the operating system of your choice. For example, you can even restore the Windows bootloader code to MBR if you want to uninstall your Gnu/Linux operating system. Super Grub Disk can easily perform quite a large range of other very useful functions that make troubleshooting and diagnosis of bootloader problems a lot faster and easier. For example, SGD has the ability to scan a computer for various files involved in the booting process. This scanning can save the user a lot of time and tedious repetition.

Super Grub Disk helps Windows users who want to use GRUB as their boot manager. GRUB is actually a much better for managing multiple boot Windows arrangements than Windows' own bootloader. A few Windows users who are clever enough like to add a Linux distro that contains GRUB just for this purpose. So, Super Grub Disk also has functions even to help those who are installing more than one Windows or who have Windows installed in a non-first partition or hard disk.

Blog Archive