Friday, October 31, 2008

Dmenu great app launcher for Openbox

Dmenu is the application menu developed for dwm and used by several other tiling window managers. It can easily be used in Openbox as well; read this post for more info on using Dmenu in Openbox. See here for how to use it with mpd.
First, you’ll need to install dmenu. You can download the source code from the dwm/wmii website and install that (’sudo make clean install’ in Ubuntu). It's also in the repo's.

You need to add dmenu.sh script to /usr/bin with this
Code:
#!/bin/sh
exe=`dmenu_path | dmenu ${1+"$@"}` && exec $exe

Create a text file with this and call it dmenu.sh and don't forget to make it executable (right click, properties, tick the run option)
For Openbox, this is what I added in the section of the rc.xml file in /home/paul/.config/openbox:
a keybinding with Alt + F3 to execute /usr/bin/dmenu.sh

Here is a screenshot of dmenu running at the bottom of the screen in Openbox:

OBdmenu

This solution found in a combo of this page: http://bbs.archlinux.org/viewtopic.php?id=57302 and this http://urukrama.wordpress.com/2008/02/07/using-dmenu-in-pekwm-and-openbox/

Openbox Logout, Reboot & Shutdown Script

Tuesday, April 1st, 2008
source:
http://crunchbang.org/archives/2008/04/01/openbox-logout-reboot-and-shutdown-script/


I have been using the latest Openbox release [3.4.7-pre2] for the last few weeks and so far I have been impressed. One of the new features from the latest release is a GDM control script. The script basically allows for a user to send reboot and shutdown signals to GDM from within the Openbox environment. This provides a means to reboot/shutdown an Openbox system in a clean and efficient manner.

Screenshot of Openbox logout, reboot, shutdown script.

I have written the following PyGTK script to take advantage of the new GDM control. Python is not currently a language that I am too familiar with, so please feel free to rip the script to bits improve as you see fit.

#!/usr/bin/env python

import pygtk
pygtk.require('2.0')
import gtk
import os

class DoTheLogOut:

# Cancel/exit
def delete_event(self, widget, event, data=None):
gtk.main_quit()
return False

# Logout
def logout(self, widget):
os.system("openbox --exit")

# Reboot
def reboot(self, widget):
os.system("gdm-control --reboot && openbox --exit")

# Shutdown
def shutdown(self, widget):
os.system("gdm-control --shutdown && openbox --exit")

def __init__(self):
# Create a new window
self.window = gtk.Window(gtk.WINDOW_TOPLEVEL)
self.window.set_title("Exit? Choose an option:")
self.window.set_resizable(False)
self.window.set_position(1)
self.window.connect("delete_event", self.delete_event)
self.window.set_border_width(20)

# Create a box to pack widgets into
self.box1 = gtk.HBox(False, 0)
self.window.add(self.box1)

# Create cancel button
self.button1 = gtk.Button("Cancel")
self.button1.set_border_width(10)
self.button1.connect("clicked", self.delete_event, "Changed me mind :)")
self.box1.pack_start(self.button1, True, True, 0)
self.button1.show()

# Create logout button
self.button2 = gtk.Button("Log out")
self.button2.set_border_width(10)
self.button2.connect("clicked", self.logout)
self.box1.pack_start(self.button2, True, True, 0)
self.button2.show()

# Create reboot button
self.button3 = gtk.Button("Reboot")
self.button3.set_border_width(10)
self.button3.connect("clicked", self.reboot)
self.box1.pack_start(self.button3, True, True, 0)
self.button3.show()

# Create shutdown button
self.button4 = gtk.Button("Shutdown")
self.button4.set_border_width(10)
self.button4.connect("clicked", self.shutdown)
self.box1.pack_start(self.button4, True, True, 0)
self.button4.show()

self.box1.show()
self.window.show()

def main():
gtk.main()

if __name__ == "__main__":
gogogo = DoTheLogOut()
main()

9 Responses to “Openbox Logout, Reboot & Shutdown Script”

  1. uterrorista wrote,

    Hi! Looks god to me. But, how do i run the script?? :D

  2. Philip wrote,

    Hi uterrorista
    To create/run the script, copy it into a new file say, /usr/bin/openbox-logout and make the file executable. You can then call the script from your Openbox menu or via the terminal with openbox-logout — or whatever you named the file.

    I should also have mentioned that the GDM features are available in Openbox 3.4.7-pre2.


I personally choose for a keybinding in the rc.xml file:


openbox-logout

Thursday, October 30, 2008

Set a custom shortcut to load an application

HOWTO : create a custom keyboard shortcut

In this case I want to use Alt + F2 to start gmrun, a very fine apps starter. I use it all the time when I'm using a Openbox session.

The goal of this HOWTO is to create a custom keyboard shortcut to run a software (like xmms, 3ddesk, ...) or what you want (xkill, transset 0.5, ...). In the example I want to start gmrun using "Alt + F2" shortcut.

1- Open GConf editor, go to apps -> metacity -> keybinding_commands, and now choose a command, for my example I choose command_1. Edit command_1 writing gmrun in order to run gmrun (or every command you want to launch).

2- In the same directory go to global_keybindings. Edit command_1 (or the command you choose in part 1) with the wanted shortcut like that : F2 .

+++++++++++++++++++++++++++++++++++++++++++++++++++
Another way to do this:
source:
http://www.linux.com/feature/59494

Start programs like a pro with XBindKeys

By Joe 'Zonker' Brockmeier on January 16, 2007 (8:00:00 AM)

Desktop environments like KDE and GNOME make it possible for you to assign keyboard shortcuts to a number of global operations, but don't make it easy to create shortcuts to run any program you'd like. To set up shortcuts for programs, XBindKeys is the way to go.

XBindKeys, as the name implies, binds keys to a command. It runs in the background and waits for you to run a shortcut that's defined in its configuration file. It handles virtually any key press (not just the modifier keys that your window manager recognizes) and is easy to set up.

Getting started with XBindKeys

I'm running XBindKeys on Ubuntu and Debian, which provide XBindKeys packages. Just run apt-get install xbindkeys xbindkeys-config as root, or using sudo, and you should be off to the races. Fedora Core 6 users (and possibly earlier versions) can run yum install xbindkeys to install XBindKeys -- though Fedora doesn't include the XBindKeys Config utility we'll talk about in a moment. If you're running Solaris, see the XBindKeys site for source and packages.

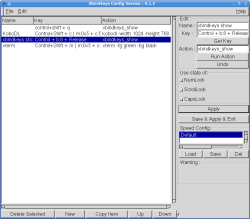
Figure 1: XBindKeys Config
XBindKeys Config - click to view

After installing XBindKeys, you'll need to generate a configuration file. The easiest way to do this is by running xbindkeys --defaults > $HOME/.xbindkeysrc, or just copying one of the example configuration files from /usr/share/doc/xbindkeys/examples to .xbindkeysrc under your home directory, if you're on a Debian or Ubuntu system.

With XBindKeys you have two ways to customize your configuration -- by hand-tweaking the configuration with a text editor, or by using the XBindKeys Config GUI utility. Let's take a look at the configuration format, and then we'll cover setting up commands using the GUI utility.

The basic syntax is very simple:

#Comment about the entry
"command"
Modifier + key

The first line is pretty obvious -- that's a comment that explains what the entry is. The comment is optional, but recommended. The second line includes the command you'd like to run when you use the shortcut. Finally, the third line provides the shortcut itself.

One of the nice things about XbindKeys, versus setting shortcuts in KDE or GNOME, is that you can also use mouse buttons in a shortcut. For instance, if you wanted to use Control plus the third mouse button to launch a program, you could use this entry:

#Mouse plus control launches gaim
"gaim"
Control + b:3 + Release

XBindKeys also accepts raw keycodes. If you wanted to use Ctrl-Shift-m to open an xterm, you could add it to the config file like this:

#Using keycodes
"xterm"
m:0x5 + c:58

The first part of the entry, m:0x5 is the modifier key -- in this case Ctrl and Shift pressed together. If you just press the Shift key, it would be m:0x1, and the Control key by itself would be m:0x4. The second part, c:58, is m by itself.

What if you don't know the keycode for a key or key combination? No problem. Run xbindkeys -k from a terminal (you'll need to see its output), and it will display a small dialog box. Make sure that box has focus, and press the key or keys that you want to get the output for. Let's say you press Ctrl-Shift-h; xbindkeys will provide output that's ready to cut and paste into your .xbindkeysrc, like this:

Press combination of keys or/and click under the window.
You can use one of the two lines after "NoCommand"
in $HOME/.xbindkeysrc to bind a key.
"NoCommand"
m:0x15 + c:43
Control+Shift+Mod2 + h

Now all you have to do is provide the command to be run in place of "NoCommand", reload xbindkeys, and you're ready to go.

If you prefer to go the GUI route, you can use the XBindKeys Config utility. Run xbindkeys-config and you'll see a window similar to Figure 1. Make sure that you've created a configuration file first or the utility will crash when you try to save your settings.

On the left side, you'll see all of the existing shortcuts. On the right side you can see the shortcut editor. At the bottom is the toolbar for working with existing shortcuts. Let's create a new shortcut by pressing New.

Now you'll see a new entry in the shortcuts pane, and the cursor will be placed in the Name field on the right side. Give the new shortcut a name, then press the Get Key button to assign a shortcut to the action. After you've assigned a shortcut, add the command you want to run to the Action field. Once you're happy with everything, click the Apply key and try out your shortcut. XBindKeys should run your command when you press the shortcut.

One thing to watch out for -- if you've assigned a shortcut that's already in use, you may not get the results you expect. I've tried assigning a number of shortcuts that conflict with global shortcuts that are already assigned under KDE. If that happens, you'll either need to change the shortcut, or reconfigure KDE's shortcuts.

After you've set up your shortcuts you can click the Save & Apply & Exit button and start using them. However, you need to restart xbindkeys anytime you modify its configuration file -- it won't re-read the configuration automatically. I usually just use killall -HUP xbindkeys.

Also, xbindkeys needs to be running in the background to work, so you will want to make sure it runs when X starts. The best way to do this, as long as you're logging in via KDM or GDM, is to put xbindkeys in your ~/.bashrc file.

With a little work up front, XBindKeys can make your life a lot easier. Give it a try and you'll be hooked in no time.

Wednesday, October 29, 2008

Open box window manager clean and fast!!

First: this is the best opebox tutorial you can think of:

http://urukrama.wordpress.com/openbox-guide/


Ok time to install a faster window manager and set of applications:

Add this repo in /etc/apt/sources.list:

#openbox https://launchpad.net/~k-belding/+archive
deb http://ppa.launchpad.net/k-belding/ubuntu hardy main
deb-src http://ppa.launchpad.net/k-belding/ubuntu hardy main

and then:

sudo aptitude update && sudo aptitude install openbox pypanel gmrun obmenu obconf nitrogen gtk-chtheme sakura scrot kazehakase sylpheed rtorrent irssi finch decibel-audio-player xfburn mirage abiword gnumeric leafpad epdfview xarchiver pcmanfm ivman

For an explination of each:

  • openbox is an alternative window manager that we’ll be using as our desktop environment. It’s snappier than Fluxbox since it was rewritten to no longer be based off blackbox code.
  • pypanel - since open box comes with no panel, this is an extremely light weight one, it can be configured in ~/.pypanelrc. You’ll need to add this to .config/openbox/autostart.sh with the line: pypanel &
  • gmrun - will give you a small run dialog upon running
  • obmenu - graphical openbox menu editting app
  • obconf - graphical openbox theme changer, among other options
  • nitrogen - lightweight application to change wallpapers
  • gtk-chtheme - will allow you to change gtk themes. Icon themes and fonts can be specified in .gtkrc-2.0
  • sakura - a light weight tabbed terminal. Easier to configure than aterm, xterm and the like.
  • scrot - a command line screenshot tool
  • kazehakase - a lightweight browser based on the gecko engine (A heads up about the hardy package: you can’t view the preference menu, it’ll crash. You can control most things through it’s config files and about:config)
  • sylpheed - a light weight email application
  • rtorrent - a command line torrent app
  • irssi - command line irc
  • finch - the command line version of finch
  • decibel-audio-player - a light weight gtk based audio app
  • xfburn - a burning application from the xfce suite
  • mirage - an extremely light weight image viewer
  • abiword and gnumeric - lighter office apps when compared to open office.
  • leafpad - extremely lightweight notepad app
  • epdfview - lightweight pdf viewer
  • xarchiver - lightweight archiving and compression tool to replace file-roller with.
  • pcmanfm - tabbed, lightweight file manager.
  • ivman - a behind the scenes auto-mounter. You’ll need to add this to .config/openbox/autostart.sh with the line: ivman &

Here are some great reads on how to configure openbox:

  1. http://icculus.org/openbox/index.php/Main_Page
  2. http://wiki.archlinux.org/index.php/Openbox
  3. http://gentoo-wiki.com/HOWTO_Openbox

And that’s it. Log into openbox and get to configuring things the way you want it.

Try only the openbox part of this page; much dangerous advice there:

http://tuxtraining.com/2008/09/28/how-to-make-ubuntu-extremely-fast/


http://icculus.org/openbox/index.php/Help:Getting_started

Great theme I'm using:

http://kiwisaotome.deviantart.com/art/Fall-is-Awesome-98169843


Instructions for Installing RPM Files Using Alien


Installing Alien

You can install alien itself from the Ubuntu Universe repository by adding the repository to your list of sources and doing:

$sudo apt-get update
$sudo apt-get install alien

Installing the .rpm file

To install the .rpm file, you first need to convert it to a .deb file which can be installed on Ubuntu.
I assume that you downloaded the package to your Desktop (~/Desktop is the directory)
You can convert the .rpm to a .deb by using the following commands.
$cd ~/Desktop
-This will change the directory to your desktop, where you have the .rpm file.

$sudo alien -k name-of-rpm-file.rpm
- This will convert the .rpm to a .deb.
- The “-k” will keep the version number. Otherwise alien adds a “1″ to the version number.
- Tip: Use Smart Tab Completion to avoid mistyping the file names :)

$sudo dpkg -i name-of-deb-file.deb
- This will install the .deb package

Try reading the alien manpage for more details on how to convert other kinds of packages and the options available.

source:

http://ubuntu.wordpress.com/2005/09/23/installing-using-an-rpm-file/

Friday, October 17, 2008

Unable to automount external hard disks

Hmm. no solution found yet.
This is an important message in regard to this
I have for years set my gnome preferences to not automount media on insertion
(much less open it). Not only was this preference forgotten in the upgrade, but
gnome-volume-properties doesn't even show /any/ options for removable media.

Have these options been deliberately removed?

(In reply to comment #5)
> Have these options been deliberately removed?

No, they have been moved to nautilus; see /apps/nautilus/preferences/media* in
gconf-editor

Ok, checked but the variables are all set in the right manner.

I think the problems started when I installed PYSDM Py storage device manager.
It's really a frontend to change fstab in /etc/fstab.

pysdm - This is a GUI for editing fstab. This utility helps to
manage mount point of various drives. Every time we logon the drives
are not auto mounted by itself, by this simple utility it can be done
very easily.

System > Administration > Storage Device Manager

http://pysdm.sourceforge.net/

Tried this:

Data
is getting proper treatment as a partition again. Unfortunately, I
still lack write permissions. I'll study up on that link you gave me
and try to figure it out.


This was progress, though, so thanks!


Should be as easy as using SUDO to give yourself permissions. Try this:


Code:
$ gksudo nautilus
Navigate to your folder '/media/Data'; right click; properties; tab over to properties; make your user the owner and give yourself all the access you need.

In case this doesn't make sense check out this link:
http://www.techotopia.com/index.php/...Ubuntu_Desktop

Alternatively you can do this, where user is your username:
Code:
sudo chown user '/media/Data'
More info on this thread:
http://ubuntuforums.org/showthread.php?t=67657

and this page:
http://www.psychocats.net/ubuntu/permissions

This didn't solve anything. So uninstalled pySDM.
Uninstalled even ntfs-3g, hmm that menas nfts isn't read anymore.
Reinstalled it, no solution

The same error message pops up again and again:
Unprivileged user can not mount NTFS block devices using the external FUSE
library. Either mount the volume as root, or rebuild NTFS-3G with integrated
FUSE support and make it setuid root. Please see more information at
http://ntfs-3g.org/support.html#unprivileged


There I find this solution:

Why can't unprivileged users mount block devices?
or
Why do I get "fusermount: option blkdev is privileged" error?
Unprivileged block device mounts work only if all the below requirements are met:
  1. ntfs-3g is compiled with integrated FUSE support
  2. the ntfs-3g binary is at least version 1.2506
  3. the ntfs-3g binary is set to setuid-root
  4. the user has access right to the volume
  5. the user has access right to the mount point
The root user can make an ntfs-3g binary setuid-root as shown below
  chown root $(which ntfs-3g)
chmod 4755 $(which ntfs-3g)
In such case the driver will also be able
  • to fix common FUSE kernel module loading problems
  • to create the required but sometimes incorrectly removed or missing FUSE device file
Please note that using setuid-root can result unforeseen privilege escalation and its usage is discouraged. Only the absolutely trusted users must be granted such access. Below is an example how this can be done for users in the ntfsuser group to be able to mount any NTFS volume if they have also the needed volume access rights.
  chown root.ntfsuser $(which ntfs-3g)
chmod 4750 $(which ntfs-3g)
The setuid-root ntfs-3g driver applies the principle of least privilege during its lifetime as a safety measure.

Why don't the 'user' and 'users' options work in /etc/fstab?
The 'mount' command doesn't invoke the ntfs-3g binary with the needed privilege after it has checked and approved the user is entitled to mount a given device on a specified mount point, hereby the user can't open the device he got the approval in /etc/fstab. This is a problem in the 'mount' utility.

Solution: Use at least NTFS-3G 1.2506 with setuid-root set and make sure the user has access rights to the volume and mount point.

So I downloaded: http://ntfs-3g.org/index.html#download version 1.5o. In the repos of Ubuntu is version 1.22 Unpacked, go in terminal to the folder and ./configure and make and sudo make install and after that did in root terminal:
chown root.ntfsuser $(which ntfs-3g)
chmod 4750 $(which ntfs-3g)
Phhewww, this wasn't easy. I wonder: an I the only one suffering from this problem??
And why doesn't Ubuntu do an update of nfts-3g when there is such an issue.

If you don't want to compile download:
http://packages.ubuntu.com/nl/intrepid/i386/libntfs-3g28/download
and install
and then download and install:
http://ubuntu.interlegis.gov.br/ubuntu/pool/main/n/ntfs-3g/ntfs-3g_1.2506-1ubuntu2_i386.deb

Don't forget to install ntfs-config through Synaptic afterwards and configure it..
else ntfs-3g stiil won't work ...

Ok , now it is possible to manage data as user but only when the root user mounts the external hard disk first! Grrrr!!

It this the solution; go to Hal and grant the user permission to (u)mount external devices and be aware about setting yes or no restraints:
But most impressive is the Authorizations panel, which allows complete control over what system functions each user is able to have.

Authorizations System Control


Monday, October 13, 2008

Recover files with Foremost or PhotRec

Foremost is a console program to recover files based on their headers, footers, and internal data structures. This process is commonly referred to as data carving. Foremost can work on image files, such as those generated by dd, Safeback, Encase, etc, or directly on a drive. The headers and footers can be specified by a configuration file or you can use command line switches to specify built-in file types. These built-in types look at the data structures of a given file format allowing for a more reliable and faster recovery.

Originally developed by the United States Air Force Office of Special Investigations and The Center for Information Systems Security Studies and Research , foremost has been opened to the general public

source code http://foremost.sourceforge.net/
Grab foremost:
sudo apt-get install foremost
Have Foremost audit your drive for recoverable files:
sudo foremost -w -i /dev/hda -o /recovery/foremost

Have foremost recover jpg files:
sudo foremost -t jpg -i /dev/hda -o /recovery/foremost
Here is the complete list of recoverable filetypes for usage with the "-t type" switch:
Available types:

jpg Support for the JFIF and Exif formats including implementations
gif
png
bmp Support for windows bmp format.
avi
exe Support for Windows PE binaries, will extract DLL and EXE files
along with their compile times.
mpg Support for most MPEG files (must begin with 0x000001BA)
wav
riff This will extract AVI and RIFF since they use the same file for‐
mat (RIFF). note faster than running each separately.
wmv Note may also extract -wma files as they have similar format. mov
pdf
ole This will grab any file using the OLE file structure. This includes PowerPoint, Word, Excel, Access, and StarWriter
doc Note it is more efficient to run OLE as you get more bang for your buck. If you wish to ignore all other ole files then use this.
zip Note is will extract .jar files as well because they use a simi‐
lar format. Open Office docs are just zip’d XML files so they are extracted as well. These include SXW, SXC, SXI, and SX? for undetermined OpenOffice files.
rar
htm
cpp C source code detection, note this is primitive and may generate documents other than C code.
all Run all pre-defined extraction methods. [Default if no -t is specified]


If you have additional suggestions or methods to restore files please comment and share your knowledge

http://www.ubuntu-unleashed.com/2008/04/howtorecover-and-undelete-text-file-in.html


Another alternative:

PhotoRe
c is file data recovery software designed to recover lost files including video, documents and archives from Hard Disks and CDRom and lost pictures (thus, its 'Photo Recovery' name) from digital camera memory. PhotoRec ignores the filesystem and goes after the underlying data, so it will still work even if your media's filesystem has been severely damaged or re-formatted.

http://www.cgsecurity.org/wiki/PhotoRec

When an external hard disk isn't recognized

Installing & Starting Storage Device Manager (PySDM)
Storage Device Manager is accessed via System > Administration > Storage Device Manager. From the command line, start it with "gksu pysdm". Root privilege is required since PySDM makes changes to system files. gksu is the cousin of sudo and should be used with graphical apps.

If Storage Device Manager is not in your menu, install it via synaptic ( System > Administration > Synaptic Package Manager ). If you don't see 'pysdm' listed in synaptic or the following command line method is not successful, go to Synaptic > Settings > Repositories > Ubuntu Software and make sure the 'universe' repository is checked. Hit the 'Reload' button to refresh the package list and then select pysdm. You can also install it via command line with:
Code:
sudo aptitude install pysdm


Now open the Storage Device Manager and select the hard drive; if you see sdb it isn't enough; the options are still greyed out;click on the small dropdwonsign so it turns from sideways down ways and you see sdb1; select that one and now can you do your configuration...

Sunday, October 12, 2008

Text to Speech (TTS) in Linux

Install Kmouth (Synaptic)
Configure TTS voices according to this page:
http://ubuntuforums.org/showthread.php?t=751169

HOWTO: Make festival TTS use better voices (MBROLA / CMU / HTS)
Introduction

Festival is a Text-To-Speech synthesis system developed at the University of Edinburgh. It can be used with several different voices, which are the models and data it uses to convert typed text into audible speech.

This HOWTO is meant to be a centralized collection of information about how to install the currently available voices for the Festival TTS. While sections of this HOWTO may apply to installing voices for other languages, it is primarily concerned with the English language voices.

The layout of this HOWTO is as follows:
  • Installing the standard Festvox diphone voices
  • Installing the enhanced MBROLA voices
  • Installing the enhanced CMU Arctic voices
  • Installing the enhanced Nitech HTS voices
  • Testing voices and choosing a default voice
  • Installing Festival 1.96(via synaptic)
Here you can download voices in many languages, bijvoorbeeld Nederlands:
http://tcts.fpms.ac.be/synthesis/mbrola.html

Saturday, October 11, 2008

Nautilus Actions: Do just about anything to a file by right-clicking it


In a default Ubuntu setup, right-clicking a file offers the opportunity to open it with an application or delete it, rename it, and so on. Wouldn’t it be useful if you could add your own right-click option that performed a specific action on the file? For example, if you right-clicked a Microsoft Word or OpenOffice.org document, how about if a Print document option appeared? If you right-click an image, how about if an option appeared to shrink the image or sharpen it?

All of this is possible using the Nautilus Actions add-in. As its name suggests, this lets you add options to the right-click menu that perform certain actions on particular types files. It’s simple to create your own action, but hundreds of ready-made scripts are available and can be imported easily.

To install Nautilus Actions, use Synaptic to search for and install the aptly-named nautilus-actions package. Once installed, the configuration program can be found on the System —> Preferences menu.

Creating a Configuration from Scratch

Let’s take as an example adding a Print document option that will appear whenever a word processing document is right-clicked. This takes advantage of the fact that OpenOffice.org Writer can be used from the command line to print any document by using the -p command option, without actually starting the program in editing mode—for example, oowriter -p filename.doc.

Here are the necessary steps (these steps can, of course, be adapted for any type of file and/or action):

  1. Start by running the Nautilus Actions Configuration program, which can be found on the System —> Preferences menu. When the program window appears, click the Add button.
  2. In the Label field of the dialog box that appears, type Print document. This is the text that will actually appear on the right-click menu and can be anything you want. You can add some text to the Tooltip menu too—this will appear if the mouse is hovered over the menu option. However, it isn’t essential. You can also select a suitable icon from the Icon drop-down list. This will appear alongside the new entry on the menu, but, again, it isn’t essential.
  3. In the Path field, type /usr/bin/oowriter. Most programs you use every day can be found in /usr/bin, and it’s necessary to provide the path to the program along with its command-line filename. If you are in any doubt as to where an application ‘lives’, open a terminal window, and type whereis command, replacing command with the name of the command in question.
  4. In the Parameters text field, specify any command options that are needed, along with the filename and path. For our particular example, we need to type -p and then %d/%f, so the line reads -p %d/%f. %d and %f are Nautilus Actions shorthand—%d refers to the path of the file that has been right-clicked, and %f refers to the filename itself. The slash in the middle separates the two, just like at the command line. As you type, an example of the command that will be executed appears at the bottom of the dialog box. This is effectively what you would type at the command line to run the same command, so you can check to ensure it makes sense.
  5. Click the Conditions tab. Here we can ensure that the new Print document option appears only whenever we right-click word processing document files, and not any others. We do this by specifying file extensions in the Filenames text field—several extensions can be entered, but they must be separated by a semicolon (;). Most word processing documents you’re likely to encounter will be .doc, .sxw, .rtf, or .odt files. If you know you will encounter others—for example, WordPerfect documents (which use the .wpd file extension)—then add the relevant file extension. Precede each file extension by a wildcard (an asterisk). For an example, see the screenshot below. Once done, click OK. Click the Close button on the main Nautilus Actions configuration window.
  6. After this, you can test your new action by right-clicking a word processing document and selecting the new option—it will appear about two thirds of the way down the menu. Also try right-clicking other files that aren’t word processing files, and note how the option doesn’t appear. If the menu option doesn’t appear when it should, try logging out and then back in again.

Importing Configurations Made by Others

By visiting http://www.grumz.net/index.php?q=configlist, you can download Nautilus Actions schemas (effectively configuration files) for just about any task you might want to do to any kind of file. To download a schemas file, click the header in the list, and then click the schemas link to download.

Be sure to read the schemas description to see whether any particular software is needed. For example, schemas that manipulate images will almost certainly need the ImageMagick software installed, so use Synaptic to search for it. Schemas that manipulate video files will probably need the ffmpeg software installed. Bear in mind that the notes alongside each schema are probably not written specifically for Ubuntu users, so don’t name specific packages you will need. You might well have to use common sense when searching through Synaptic’s package archive.

Once the schemas have downloaded, open Nautilus Actions Configuration (System —> Preferences menu), and click the Import/Export button. Then click the button to the right of the File to Import text field, and browse to the schemas file. Click the OK button, then the Close button in the Nautilus Actions parent window. The new menu option will appear immediately, although you might have to log in and out again to see the icon (if applicable) appear alongside its entry in the list.

Friday, October 10, 2008

http://appnr.com/ Install apps via weblinks

A new way to discover and install tools via weblinks:
http://appnr.com/

Wednesday, October 8, 2008

Howto kill a process in linux


If you have a program that using a lot of your computers resources or not responding it can be necessary to kill it the hard way, here are some ways to do that.

source: http://jonorland.blogspot.com/2008/09/howto-kill-process-in-linux-if-you-have.html

  • With the kill command.
    If you know the PID (every process in your system has a uniq number, that's the PID, shortcut for Process IDentifier ) of the process, you can send it a signal with the kill command. There are several signals you can send and depending on the process it will be terminated. Some of the most common signals to end a process are SIGHUP, SIGINT, SIGTERM and SIGKILL. SIGTERM is the signal you should try first and if that don't work use SIGKILL. To send a signal to the process with the kill command type this in a console: "kill -SIGNAL PID" where you replacing SIGNAL with a signal and PID with the processes process identifier number. To find out the PID of a process you can use one of the "pidof", "pgrep", "top", or "ps" command in a console.

  • With the pkill command.
    pkill is a command similar to kill in that it will send signals to a process to terminate it, the difference to kill is that you don't need know it's PID, instead you terminate a process based on its name. If you type "pkill firefox" in a console pkill will terminate all processes with firefox in it's name. pkill will by default send a SIGTERM signal but that can be changed. WARNING! be careful as pkill will terminate ALL your processes that have what you specified in its name.

  • With the xkill command.
    In X-Windows you can kill processes that have a window with the xkill command. Running xkill will get you a mouse cursor of a death skull and if you click with it on a window it will be terminated. In KDE pressing the Ctrl+Alt+Esc keyboard shortcut will run the xkill command.

  • With KDE.
    In a default KDE setup you can press Ctrl+Esc keyboard shortcut to open a window with all processes listed and from where you can right click on one and choose a signal to send to it.
  • With SysRq.
    With the SysRq keyboard key you can make the kernel do some really powerful stuff with you system. Type "cat /proc/sys/kernel/sysrq" in a console to see if SysRq it is enabled, if the result is "1" it's enabled or else you can activate it by running one of this command as root "echo 1 > /proc/sys/kernel/sysrq" or with the sysctl command like this "sysctl -w kernel.sysrq=1". By pressing any of the keyboard shortcuts below you will tell the kernel to do what's described in the parentheses.

    Alt+SysRq+r (The r stands for put keyboard in raw mode)
    Alt+SysRq+s (The s for sync the disk)
    Alt+SysRq+e (The e for terminate all processes)
    Alt+SysRq+i (The i for kill all processes)
    Alt+SysRq+u (The u for remount all file systems read only)
    Alt+SysRq+b (The b for reboot the system)
Beware that using some of these SysRq commands it is very dangerous as it will kill all processes in your system and you will loose all data that are not saved. Use it at your own risk and only as a last option.

Good luck killing your system.

Tuesday, October 7, 2008

Install KDE 4.1 In Hardy

http://www.digiplace.nl/2008/09/10/kde-41/

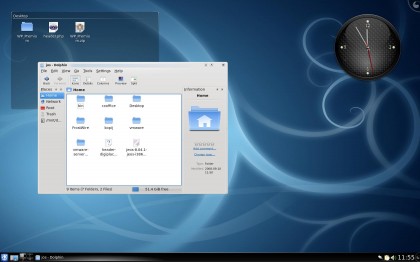
KDE is zich behoorlijk aan het ontwikkelen. De huidige KDE 4.1 versie ziet er in ieder geval behoorlijk strak uit.

Digiplace met een KDE jasje aan

Digiplace met een KDE jasje aan

Het is eenvoudig om KDE ook eens uit te proberen. In principe kan dat al met de standaard sources van Ubuntu. Maar specialisten hebben een eigen bron gemaakt met meer up to date pakketten. Dit is geen zgn. “vertrouwde bron” die wordt beheerd door Ubuntu dus je krijgt een waarschuwing dat je geen sleutel hebt voor deze bron. Als dit je niet afschrikt voeg je onderstaande bron toe aan je softwarebronnen:

deb http://ppa.launchpad.net/kubuntu-members-kde4/ubuntu hardy main

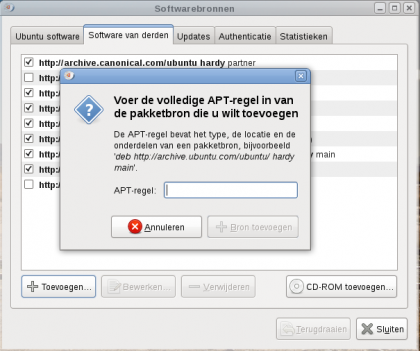
Ervaren gebruikers weten dan dat ze daarvoor /etc/apt/sources.list moeten bewerken, gevolgd door een sudo apt-get update. Maar het kan ook vanuit Gnome. Ga daarvoor naar je menu, Systeem, Beheer en kies daar voor Softwarebronnen. Als je het programma hebt geopend klik je op het tweede tabblad “software van derden” en klikt vervolgens op “Toevoegen. Voer dan die regel toe in het scherm zoals je hieronder ook afgebeeld ziet staan.

Software bronnen toevoegen

Software bronnen toevoegen

Als je dat hebt gedaan worden de software bronnen bijgewerkt en kan je onderstaande opdracht in een terminal geven om deze KDE versie te installeren. (Ja, dat kan ook via Synaptic, maar via een terminal gaat wel veel sneller!)

sudo apt-get install kubuntu-kde4-desktop

Tijdens de installatieprocedure komt er dan een vraag of je gebruik wil maken van GDM (Ubuntu) of KDM (KDE) inlogmanager. Het advies is om GDM te behouden.

Om de KDE programma’s niet in je Gnome menu te zien kan je eenvoudig met Systeem, Voorkeuren, hoofdmenu de vinkjes verwijderen bij die applicaties.

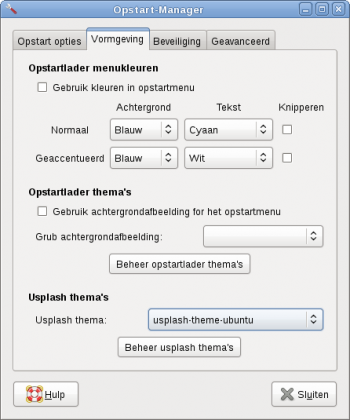
En met behulp van Opstart-manager (sudo apt-get install startupmanager) kan je de usplash van Kubuntu weer terugzetten naar Ubuntu. Want dat is het nadeel als je een Kubuntu-desktop metapackage installeert. De eerstvolgende keer dat je de computer opstart is Ubuntu schijnbaar vervangen voor Kubuntu. En dan is de Opstart-manager het makkelijke hulpmiddel om Ubuntu weer terug te toveren. Onderstaande screenshot laat zien hoe je dat moet doen.

Verander Usplash thema

Verander Usplash thema

english: http://maketecheasier.com/install-kde-41-in-ubuntu-hardy-heron/2008/07/31

Monday, October 6, 2008

When Pulse Auudio leads to problems

Schakel PulseAudio uit

Ubuntu 8.04 heeft een nieuw audiosysteem, genaamd PulseAudio. In sommige omstandigheden, bij bepaalde geluidskaarten, werkt dit niet goed. U kunt wellicht uw geluidsprobleem oplossen door Pulse Audio uit te schakelen en "terug te stappen" op het oudere ALSA. Doe dit als volgt:

a. Systeem - Beheer - Synaptic pakketbeheer

zoekterm: alsa-oss

vink het pakket aan en druk op de knop Toepassen

b. Systeem - Voorkeuren - Geluid

Zet alles op "ALSA - Advanced Linux Sound Architecture", bij Geluidsacties, Muziek en films en Audio-conferentie.

c. Doe daarna een volledige herstart van uw computer (waarschijnlijk niet nodig, maar doe het voor alle zekerheid toch even).

Let op: het is een gebruikersinstelling. Herhaal stap b en c dus in elk gebruikersaccount.

source:

http://computertip.googlepages.com/geluidskaartinubuntu


udio from switching Pulse

Ubuntu 8.04 has a new audio system, called Pulse Audio. In some circumstances, with certain sound cards, this is not working properly. You can probably solve your sound problem by shutting down Pulse Audio and to "step back" on the earlier ALSA. Do this as follows:

a. System - Administration - Synaptic package management

Keyword: alsa-oss

Check the package and press the Apply button

b. System - Preferences - Sound

Put everything on "ALSA - Advanced Linux Sound Architecture", at Sound Action, music and movies and audio conference.

c. Then do a full restart of your computer (probably not necessary, but do it anyway just to be sure).

Please note: it is a user setting. Repeat step b and c therefore each user.


Sunday, October 5, 2008

The only safe way to label a partition

Ik wil een etiket (label) geven aan een partitie

Makkelijk een etiketje plakken op een EXT3-partitie, doet u met het terminalprogramma e2label.

Voorbeeld voor partitie sda7, die u het etiket "appelflap" wil geven:

Toepassingen - Hulpmiddelen - Terminalvenster
tik in:

sudo e2label /dev/sda7 appelflap

druk op Enter. Uw wachtwoord blijft onzichtbaar, dat hoort zo.

Daarna volledige herstart van uw PC.
Overal in uw grafische omgeving heet sda7 nu appelflap, maar onder de motorkap heet hij nog steeds sda7.

Let op: e2label werkt alleen bij partities die geformatteerd zijn in EXT3 of EXT2. Dus niet bij FAT, FAT32, NTFS en ook niet bij de swap.


If you want to give a label to a partition:

the easy way to paste a label on an EXT3 partition use a terminal program e2label.

Sda7 partition for example, you want to name multimedia:

Applications - Tools - Terminal Window
type:

sudo e2label / dev/sda7 multimedia

press Enter. Your password remains invisible.

Then restart your entire PC.
Throughout your graphical environment sda7is called multmedia now, but under the bonnet is he still sda7.

Please note: e2label works only with partitions formatted in EXT3 or EXT2. So not FAT, FAT32, NTFS, and not with the swap.


Never use gparted to rename partition; all data on it will be lost!!

Use Operea for IE only webpages

Ik wil een website bezoeken die alleen toegankelijk is voor Internet Explorer

Gelukkig komt het tegenwoordig nog maar zelden voor, maar er zijn nog steeds websites die melden dat ze alleen toegankelijk zijn via de webbrowser Microsoft Internet Explorer. Probeer het daarbij eens met webbrowser Opera, en laat die zichzelf op die website identificeren als Internet Explorer. Als volgt:

- installeer Opera via Synaptic.

Let op: hiervoor moet de pakketbron "hardy partner" zijn ingeschakeld: zie punt 19 op deze pagina

- Toepassingen - Internet - Opera

- Opera werkbalk: Tools - Quick preferences - Edit site preferences - tab Network - Browser identification - Identify as Internet Explorer.

How do I clean my system?

The only thing you have to do in Ubuntu, is this:

System - Administration - Synaptic package management

Settings - Preferences - Files

Temporary files:check radio button: Retrieved remove packages after installation

Press the button: buffered package files

Beste Nederlandse site voor Ubuntu beginners

http://computertip.googlepages.com/home

Dit is Tux, de officiële Linux-mascotte

Linux is leuk en makkelijk!

Linux is een prima besturingssysteem voor uw computer: het is gratis, veilig en gebruikersvriendelijk. Hier vindt u een opsomming van de voordelen van Linux

Zelf aan de slag

Een Linuxvariant heet een distributie, oftewel een distro. Hier geef ik u eenvoudige handleidingen en tips, zodat u zelf met een Linuxdistro aan de slag kan gaan. Ik wens u veel plezier!

1. De makkelijkste van de grote Linuxdistributies: Ubuntu Linux 8.04
enz.....

VLC crashes due to Pulse audio output and Opengl video output.

VLC crashed and I opened it in terminal with command vlc.
Setup:
Hardy 8.04
Ati radeon 9800
pentium 4 3 gig mem 1 gig

Got this error message:
------------------------------
VLC media player 0.8.6e Janus

(.:11236): Gtk-WARNING **: Kan themamodule in modulepad: ‘clearlooks’ niet vinden,
[00000345] main audio output warning: output date isn't PTS date, requesting resampling (79748)
[00000345] main audio output warning: buffer is 72748 late, triggering upsampling
[00000343] main private error: option glx-shm does not exist
[00000345] main audio output warning: output date isn't PTS date, requesting resampling (45163)
[00000345] main audio output warning: timing screwed, stopping resampling
[00000345] main audio output warning: buffer is 113890 late, triggering upsampling
libGL error: drmGetMagic failed
libGL error: reverting to (slow) indirect rendering
[00000345] main audio output warning: audio drift is too big (136869), dropping buffer
X Error of failed request: BadMatch (invalid parameter attributes)
Major opcode of failed request: 143 (GLX)
Minor opcode of failed request: 5 (X_GLXMakeCurrent)
Serial number of failed request: 58
Current serial number in output stream: 58

-------------------------------------------------

found first part of the solutio here:

Verbeter de werking van muziek- en filmspeler VLC

VLC werkt nog niet goed via het nieuwe geluidssysteem Pulse Audio. Zet VLC daarom terug op het oude ALSA-systeem:

a. Start VLC

b. Werkbalk VLC: Instellingen - Preferences - Audio - Uitvoermodules

c. Zet vinkje bij: Geavanceerde opties (rechtsonderin)

d. Audio output module: zet hem op "ALSA audio uitvoer".

e. Klik op "Opslaan" en sluit VLC.

http://computertip.googlepages.com/enkelebekendefouteninubuntu

(great site for dutch readers)

++++++++++++++++

By setting the VLC audio output to Alsa the faultmessage was reduced to:
(.:11652): Gtk-WARNING **: Kan themamodule in modulepad: ‘clearlooks’ niet vinden,
[00000343] main private error: option glx-shm does not exist
libGL error: drmGetMagic failed
libGL error: reverting to (slow) indirect rendering
X Error of failed request: BadMatch (invalid parameter attributes)
Major opcode of failed request: 143 (GLX)
Minor opcode of failed request: 5 (X_GLXMakeCurrent)
Serial number of failed request: 58
Current serial number in output stream: 58

------------------------------------------------------

Found the rest of the solution here:


http://ubuntuforums.org/showthread.php?t=419018

open vlc (no video, just open it as a program), and do the following:
click - settings > preferences > video
in the bottom right, put a checkmark in "advanced options"
then click - output modules
and change "video output module" from "opengl video output" to "x11 video output".


Saturday, October 4, 2008

Using Gmail in Sylpheed Email Client

http://www.melvilletheatre.com/articles/sylpheed-gmail/index.html

How to use the Sylpheed email client with Gmail

By Frank Cox

(July 23, 2007)


I have been unable to find any other documentation that explicitly describes how to use the Sylpheed email client with your gmail account. Accordingly, this short article will describe the procedure.

I currently use Fedora 7 on my main desktop computer, but these instructions should be largely applicable to any distribution. You may have to use apt-get or whatever in order to install the programs instead of yum, but the overall process should work pretty much the same way everywhere.

WHAT IS SYLPHEED

Sylpheed is a very nice email client for Linux that I have been using for the past number of years. For a description of all of the features that it offers, their homepage is here.

On Fedora, you can install Sylpheed with the following command (as root):

yum install sylpheed

You can also download the source code from the Sylpheed homepage and create your own rpm from that by using the following commands.

Note that if you want to have the automatic spellchecking option you need to have gtkspell-devel installed on your computer before compiling the Sylpheed tarball.

yum install gtkspell-devel

Now create the rpm:

rpmbuild -ta –-clean sylpheed-2.x.x.tar.bz2

Now install it:

rpm -i sylpheed-2.x.x-1.i386.rpm

WHY USE SYLPHEED WITH GMAIL?

Sylpheed works very well with gmail. You can download your messages to your computer and read them offline if you wish. When you have multiple email accounts on various mailservers (as I do) then you can use Sylpheed to aggregate all of your email in one place. Sylpheed can sort your email using various filters, and it has native support for spam filtering using bogofilter or bsfilter.

I have Sylpheed set up to automatically download email from all of my accounts every ten minutes. I just leave it running on my desktop and every time I remember to look at Sylpheed I can see at a glance if I have any new mail without pushing any buttons or doing anything at all.

BASIC SETUP FOR SENDING AND RECEIVING MAIL FROM GMAIL SERVERS

GMAIL USES SSL CERTIFICATES

The above setup will allow you to pick up and send email through gmail. However, you will receive this error when you try to pick up your mail:

The SSL certificate of pop.gmail.com cannot be verified by the following reason: 
unable to get local issuer certificate
Server certificate:
Subject: /C=US/ST=California/L=Mountain View/O=Google Inc./CN=pop.gmail.com
Issuer: /C=US/O=Equifax/OU=Equifax Secure Certificate Authority
Do you accept this certificate?

You can click “Yes” in response to this dialog and Sylpheed will then continue to work with gmail until you exit the program. However, every time you start a new Sylpheed session you will have to click “Yes” again.

You will receive a similar error when you attempt to send email out through gmail. You only get these errors once per session, but it would be a lot nicer to not get them at all.

This is how you can install the missing local issuer certificates that Sylpheed is looking for. After installing the certificates you no longer have to deal with this issue.

HOW TO INSTALL GMAIL'S SSL LOCAL ISSUER CERTIFICATES FOR SYLPHEED

To accomplish this procedure, you need to have a copy of the c_rehash program installed. c_rehash creates symbolic links to the hash values of your trusted certificates.

On Fedora Linux, c_rehash is included in the openssl-perl rpm, so you do this to install it:

yum install openssl-perl

Gmail requires two SSL certificates. There is an Equifax certificate that is required for receiving email and a Thawte certificate that is required for sending email.

To obtain the Thawte certificate that you will require, go to http://www.thawte.com/roots and download thawte-roots.zip from there. Unzip it somewhere and remember where you put it.

When you first run Sylpheed, it creates a directory in your home directory called ~/.sylpheed-2.0 which contains all of its configuration files.

Do the following:

mkdir ~/.sylpheed-2.0/certs

Copy the file named ThawtePremiumServerCA_b64.txt from the thawte-roots.zip file that you downloaded above into the certs directory that you just created and rename it from .txt to .pem:

cp Thawte\ Server\ Roots/ThawtePremiumServerCA_b64.txt ~/.sylpheed-2.0/certs/ThawtePremiumServerCA_b64.pem

Now download the Equifax certificate to your Sylpheed certs directory with the following command:

wget -O ~/.sylpheed-2.0/certs/Equifax_Secure_Certificate_Authority.pem https://www.geotrust.com/resources/root_certificates/certificates/Equifax_Secure_Certificate_Authority.cer

(Note that the above commandline is all one line, but it is so long that your web browser is probably showing it to you as two lines. Make sure that you copy-and-paste it as one single long line with one space between .pem and https:)

Now create the symbolic links:

c_rehash ~/.sylpheed-2.0/certs/

You're done. The Sylpheed email client will now work perfectly with your gmail account.

rtorrent howto

Howto: Use rtorrent like a pro

I’m a huge rtorrent fan. I can’t imagine why anyone would use anything else, unless there’s something funky the big-name programs can do, that rtorrent just doesn’t handle yet.

This time, instead of introducing you to rtorrent nice and easy, like I did with cplay, I’m going to give you a brief tour, and then I’ll show you something very cool you can do with it. rtorrent is an amazing, complex, powerful program that is at the same time sleek, clean, comprehensive and ultralight — and I’m giving you just one small idea of its potential.

But first, let’s scratch the surface. Like a lot of console-driven programs, the startup screen for rtorrent is … rather dry.

That’s all you get. Exciting, isn’t it? :roll:

To add a torrent, press return and navigate to the torrent file. In this example, I’m using the latest HYPE album, “Just a Catwalk from Heaven,” from Jamendo. I can’t guarantee you’ll like it, but it’s a free and legal download and it makes for a good example.

You can use tab completion to make your way to it. Double-tab shows a list of available path options that match the path you’ve already started. Your path starts in your home directory (unless you started it in a lower directory than that), so you don’t have to give it the full root path if you don’t want to. Press enter when you’ve found the one you want, and rtorrent will add it to the list.

Note that it’s still labeled as “INACTIVE.” rtorrent won’t start downloading until you tell it to. Use the arrow up and down keys to highlight the torrent (it will be marked with a bar of asterisks) and press CTRL+S.

Now we’re moving. The torrent is marked as active, the tracker will be contacted, and provided there are adequate seeds, downloading will start.

That’s about it, in a nutshell. There are some customary points that you’d expect from a torrent client. Press the right arrow while a torrent is highlighted, to see a detailed breakdown of the information available.

To get back to the main list, use the left arrow. Bandwidth throttling might be important to you too. If you’re used to capping your bandwidth (I choke my upload speeds to keep my wireless router from having a nervous breakdown), try using the a-s-d, A-S-D, z-x-c and Z-X-C keys to trim the speed to your liking.

If you take a few moments to experiment, you’ll find that pressing the numbers 1-6 gives you a revised view, with different filters applied. That can be useful if you’ve got 10 or 12 torrents running at a time, and you want a clear list of finished torrents, or stopped torrents. And most important, you can quit the program with CTRL+Q.

This is where you can stop if you just wanted the short tour. The next part is for people who really want to put rtorrent to work, and don’t mind getting their hands dirty. :twisted:

When you started rtorrent for the very first time, you probably saw a warning message that told you there wasn’t a .rtorrent.rc file to follow. That configuration file is what morphs rtorrent from a mild-mannered, law-abiding console gimmick into an unholy torrent-wrangling banshee.

In Ubuntu, the sample rtorrent configuration file is hiding at /usr/share/doc/rtorrent/examples/rtorrent.rc. Copy one for your own perusal, and give it the proper hidden file prefix.

cp /usr/share/doc/rtorrent/examples/rtorrent.rc ~/.rtorrent.rc

Now open that file in your favorite text editor. Take a minute or two to peruse the guts. (I’ve copied one to the Ubuntu-nl pastebin for reference, or if you’re reading this at work on your $3,000 DRM-crippled Vista rig. :P )

You should get an idea of what the file can do; setting max uploads and downloads, default throttling and IP masking are all options. But take a closer look at some of these settings.

# Watch a directory for new torrents, and stop those that have been
# deleted.
#schedule = watch_directory,5,5,load_start=./watch/*.torrent
#schedule = untied_directory,5,5,stop_untied=

What’s that mean, you say? Well, it means rtorrent can watch a directory and add torrents to its list automatically, and stop torrents if the corresponding file disappears. Now look at this:

# Stop torrents when reaching upload ratio in percent,
# when also reaching total upload in bytes, or when
# reaching final upload ratio in percent.
# example: stop at ratio 2.0 with at least 200 MB uploaded, or else ratio 20.0
#schedule = ratio,60,60,stop_on_ratio=200,200M,2000

You can also allow seeding to a specific ratio, a specific total uploaded or both. So if you get tired of carrying the weight of the Internets on your shoulders, you can limit your sharing on any number of criteria.

That’s nothing new, you might say. Azureus does all that, plus it has a feature-rich GUI, is proof of the viability of Java applications and has a cool blue frog as a mascot.

Well, please allow me to retort … with a case study: Imagine you’ve got two machines: Your $3,000 dual-core, dual SATA-drive, LED-bespeckled laptop straight from Dell, with an array of glossy sheen snap covers, eight USB ports, a gigabit connection and a built-in 802.11a-wireless card.

Your other machine is the lowly 166Mhz Pentium laptop. The one with 64Mb of PC66 and a 3Gb hard drive. The one you got from work in 1997 and never took back, even when you left them for another company during the dot-com boom. Burnt-out pixels, loose hinges and one scratchy speaker. The one with the Stone Temple Pilots sticker peeling off the lid. You know what I’m talking about. :mrgreen:

Set up your main rig with a shared network folder (NFS would be perfect for this) on a static IP address. Set up your lowly Pentium machine with a hard line to your router, maybe with a PCMCIA LAN card — something that at least gives you decent access speeds.

Now mount that shared folder directly into your slave’s home directory, maybe under ./watch. Set up the configuration file. Trigger rtorrent on bootup, and tell it to watch that folder.

Now you surf away in the comfort of your shiny dual-core desktop-replacement laptop, and when you find a torrent you like, save it into the local networked folder — perhaps even sending it to that folder automatically, through Firefox’s file extension preferences.

When you save it, rtorrent snaps it up and adds it to its list. It starts downloading it automatically, saving the file locally or perhaps on an external drive. You can set it to follow a certain bandwidth schedule so it doesn’t overwhelm the network, or you could hold all the torrents until the middle of the night, and do all your downloading during the wee hours.

It continues to download until it’s finished, then seeds for as long as you allow it. If it reaches the seeding ratio you set, it stops. If it reaches the upload limit, it stops. And best of all, if you delete the control torrent file out of your local download directory, it halts all the activity on that torrent and subtracts it from the list. Download the torrent, and it starts immediately. Change your mind and delete it, and rtorrent cuts it loose. Clean and neat, all handled automatically and without the least amount of effort on your part. It’s almost like a torrent daemon.

(In my experience, rtorrent never deletes the product files it has already created. So if you start downloading and change your mind an hour later, rtorrent might take the torrent out of the list, but the target files are still available. Conceivably, you could change your mind again and re-download the torrent file, and rtorrent would pick up the already downloaded fraction and get back to work on it. But I’m not 100 percent sure on that because I don’t recall ever doing it, so don’t hold me to that. :) )

I’ll be honest and say I haven’t used Azureus in more than a year, and so it’s possible that you could create the same arrangement with Azureus. But can Azureus run on your leftover Pentium Pro laptop?

rtorrent is highlighted in that htop window. CPU usage is 1.3 percent of my 1Ghz and the memory profile is 1 percent of my 512Mb, and that’s while it seeds the HYPE album I started downloading when I started writing this. Add a few more torrents and of course the profile will go up, but the benefit of running without Java, without the X interface and without two dozen Gnome dependencies should be blatantly obvious. I’m willing to bet your old Pentium could do it.

Spacewise, rtorrent is going to cost you 314Kb for the download and 860Kb to install. libtorrent9 is necessary, so that’s another 284Kb to download and 788Kb on your drive, so you’re looking at less than 600Kb of bandwidth and maybe 1.6Mb installed. Again, I’ve written letters to Mom that took up more space than that.

I hope this is convincing enough to get you to try rtorrent, and maybe even use it on a regular basis. I really believe it’s a better option than most of the prevailing torrent clients, even if it is console-based. If you want to delve even deeper into this amazing little program, take a spin past the rtorrent wiki, which is one of the best-composed and best-written I’ve seen in a long time. The project is very active, and it has the look of it.

Edit, 2008-08-04: If you’d like to see a working example and configuration files for the systems I described here, take a look at this post.

Printer HP Laserjet 2100/m/tn installeren

The simple way:
Ga naar -> Systeem -> Beheer-> Afdrukken-> in de werkbalk-> nieuwe printer -> daarna kiezen LPT#1
Hij zoeken naar stuurprogramma's -> hp kiezen -> dan nog laserjet 2100 kiezen

Go to -> System -> Administration-> Print-> in workbar-> new printer -> then choose LPT # 1
It searches for drivers -> choose hp-> then choose laserjet 2100

Better is to install:HPLIP Toolbox

Toepassingen - Installeren/verwijderen

zoekterm: hp

Vink HPLIP Toolbox aan en druk op Wijzigingen doorvoeren.

4. Zet uw printer aan en wacht even. Ubuntu herkent nu uw printer. Negeer het minischermpje dat u mededeelt dat de printer is geïnstalleerd. Nu wilt u het printerherkenningsprofiel dat Ubuntu heeft aangemaakt, verwijderen: u wil die klus namelijk straks laten opknappen door HPLIP Toolbox, die het beter doet.

Systeem - Beheer - Afdrukken

Selecteer uw printer in het linkerdeel van het scherm en druk op de knop Verwijderen.

5. Systeem - Voorkeuren - HPLIP Toolbox
Hiermee installeert u uw printer, inclusief de benodigde firmware. Ga met elk voorstel van HPLIP Toolbox meteen akkoord.

6. Zet na de installatie uw printer even op Standaard:

Systeem - Voorkeuren - HPLIP Toolbox

Tabblad Print Control - Set as default


7. Kijk welk stuurprogramma het beste resultaat geeft: de hpijs of de foo2zjs.

Systeem - Beheer - Afdrukken

Tabblad Instellingen - Merk en model: druk op knop Veranderen...

Bij de HP Laserjet 1018 geeft de foo2zjs de mooiste afdrukken, zeker bij grijswaarden.

Commentaar: ook bij mij!!

bron: http://computertip.googlepages.com/hplaserjet1018en1020

Friday, October 3, 2008

How to update firefox


How To Install firefox-3.0.tar.bz2 in Linux


A. You won't lose any of your bookmarks or browsing history created by Firefox 2.0, but some of your extensions and other add-ons might not work until updates for them are made available.

Backup Existing Firefox 2.0 Settings

Just backup existing Firefox 2.0 settings:
$ mkdir ff.backup/
$ cp -avr .mozilla/ ff.backup/

Installing Firefox 3 on Linux

Just use the following instructions to download and install Firefox.

Download Firefox 3.0 for Linux

Visit official website to grab latest version. You can also use wget command to download firefox.
$ cd /tmp
$ wget 'http://download.mozilla.org/?product=firefox-3.0&os=linux&lang=en-US'

Linux Install Firefox for all users

First close all running old Firefox 2.x sessions. Login as the root and type the following command to move old firefox 2 and install Firefox 3 under Linux:
# cd /opt
# mv firefox firefox.old
# cp /tmp/firefox-3.0.tar.bz2 .
# tar -jxvf firefox-3.0.tar.bz2


To start firefox, enter:
$ /opt/firefox/firefox &


source:http://www.cyberciti.biz/faq/install-firefox3tarbz2-linux/

How to umount when the device is busy

It happens all the time doesn’t it? You need to unmount a CD or you want to pack away the external drive but when you try to umount it you get the dreaded “device is busy” message. Wouldn’t it be great if Linux actually told you what was keeping the drive busy? Here we are in 2008, I’m using Ubuntu Gutsy, and that message hasn’t changed in all the years I’ve used Linux.

# umount /media/disk/
umount: /media/disk: device is busy

First thing you’ll do will probably be to close down all your terminals and xterms but here’s a better way. You can use the fuser command to find out which process was keeping the device busy:

# fuser -m /dev/sdc1
/dev/sdc1: 538
# ps auxw|grep 538
donncha 538 0.4 2.7 219212 56792 ? SLl Feb11 11:25 rhythmbox

Rhythmbox is the culprit! Close that down and umount the drive. Problem solved!

Blog Archive